
[vc_row][vc_column][vc_column_text]
Magic Realm Combat — The Very Basics
My story about my sons’ misadventures with the Tremendous Demon sparked some lively Magic Realm discussion, and ultimately, led to a friend and I playing a couple of games. My buddy enjoys Magic Realm quite a bit, but admits he rarely plays the game without me because he doesn’t quite understand combat or magic enough to play the game on his own. Even with the wonderful tool Realmspeak, he just isn’t comfortable.
That fact, and a couple of comments led me to think a few tutorial posts might be a good idea. Now, I am by no means an expert player — I die a lot. But hopefully, I will be able to add a little to your understanding of this awesome game.
The next few posts, we will be going over the combat rules, in increasing detail. If that works out, and I don’t run out of steam, or totally confuse everyone, I will move on to spell casting. So, let’s start with the basics of Magic Realm’s amazing combat system.
One thing to remember — Relax, it’s not that bad. For as legendarily complex as MR is, ultimately, the combat system deals with the same core things that any rpg combat system does. Do you hit your target? How much damage do you do? How much damage can you take? The actual guts of the combat system are pretty simple and much of the difficulty comes from making the NPCs work, and from the various additions… like horses, spell casting, etc.
The Combat Sequence
The MR combat sequence has the following steps
- Luring
- Random Assignment
- Deploy
- Actions
- Assign Targets
- Position Attacks and Maneuvers
- Shift Monsters and Roll Tactics
- Resolve Attacks
- Wound/Fatigue
- Check for Combat End
 For this first post, we are going to focus on the core of the combat system: Do you hit your target? How much damage do you do? How much damage can you take? To do that we are going to run through a simple battle –the Captain facing a lone axe goblin.
The first three phases of the combat sequence deal with which monsters attack which characters/hirelings. Because there is one unhidden character, facing a single monster, we know who is attacking whom, and so we can effectively ignore Luring, Random Assignment and Deployment for this battle. Every round, the goblin ends up on the Captain’s combat sheet, attacking him. Similarly, every round, we will be attacking the goblin.
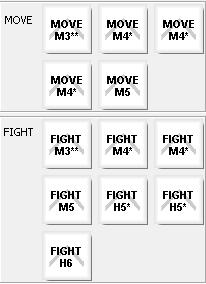 |
| The Captain’s 12 Combat Chits |
Combat Chits — Move and Fight
Every character’s combat abilities are described by a set of 12 combat chits.
- Chits have a Type: FIGHT chits are used to attack, MOVE chits are used to defend. (MAGIC chits also exist, but that is for another time.)
- Chits have a Weight: Chits are either Light, Medium, Heavy orTremendous. The weight of a chit tells us what kinds of weapons and armor can be used in battle. If you have a medium weapon, you need a medium chit to use it. If you are wearing heavy armor, you can only play heavy or tremendous MOVE chits. The weight of a chit can also alter the damage of an attack. We’ll discuss that later.
- Chits have a Speed: Chits have a speed from 1 (super fast) to 6 (really slow). The speed of the chits played in a given round can determine whether or not an attack hits, and the order in which they are resolved.
- Chits have Effort: Each chit has anywhere from 0 to 2 effort asterisks that tell us how tiring a specific chit is to play. A chit with no asterisks does not require effort. A chit with two asterisks is very tiring to play.
So, the Captain has medium move chits, which means he can wear medium armor. His speeds are between 3-5, which is average, but notice that his MOVE M3** has two asterisks. It is very tiring to play, and we’ll usually try not to play it if possible. We have a mix of medium and heavy fight chits, and so, we can wield weapons that have a heavy weight. However, our FIGHT H chits are slow, and we start with a light weapon, so we will generally stick to the medium FIGHTs. These are similar to our MOVE chits, having speeds 3-5, but the fastest chit has two asterisks and tires us out.
Monsters Have “Chits” Too… Sort Of

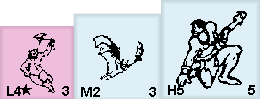
Our goblin adversary has similar “stats” as well. Denizens of the realm have two sides representing different “tactics” they use in battle. Monsters start a battle light-side up and on that side, the goblin has a block that looks like this L4*. This means that the goblins FIGHT does Light damage, and attacks with a speed of 4. Monsters don’t fatigue though… that star is a sharpness star, and it increases the damage of the goblin’s attack (we’ll talk about that later). The 3 on the opposite side of the counter without the letter, is the goblin’s MOVE speed of 3.
If the goblin “changes tactics” during combat, he will turn dark-side up. If that happens, the goblin’s attack becomes Medium (with a sharpness star), but his MOVE speed drops to 4. He hits harder, but is slower on defense.
Vulnerability
Both the Captain and the goblin have another important characteristic that isn’t shown on any counter —Vulnerability. Vulnerability is your toughness. It reflects how hard a hit you can take before you die. The Captain’s vulnerability, listed on his character card, is Medium. A medium harm hit to the Captain will kill him.
 |
| Medium, Heavy and Tremendous |
The goblin’s vulnerability is also medium and we can tell this by the size of his counter. Monsters with small counters have Medium vulnerability. Monsters with the mid-sized counters are Heavy and monsters with the largest counters are Tremendous.
Weapons of War
The final thing I want to look at before getting to the actual battle is the weapon carried by the Captain. Weapons in Magic Realm have several characteristics.
- Weapons Have a Weight: A weapon has a weight (Negligible, Light, Medium, Heavy orTremendous) that indicates how strong a FIGHT chit is required to play it. In addition, the weapon’s weight determines how much damage it does when it hits.
- Weapons Have Sharpness: Some weapons have sharpness starts next to their weight. Just like the goblin, these stars will increase the damage done when the weapon hits. We’ll discuss exactly how much later.
- Weapons Have a Speed: Some weapon chits have a number on them. These are speed numbers and work like FIGHT chits. 1 is really fast, 6 is really slow. If your weapon has a speed associated with it, then that number supersedes the speed on your FIGHT chit. This can be really important to remember in a fight.
- Weapons Have an Alerted Side and an Unalerted Side: All weapon chits have two sides. The white side with no asterisk is the UNALERTED side. The red side, with the asterisk, is the ALERTED side. This is important because most weapons have totally different (better) stats when they are alerted.
- Weapons Have a Length: Weapons have a length which, along with speed, helps determine who strikes first in a battle. The lengths of the weapons are printed in a chart in the rule book.

Now, let’s look at the Captain’s short sword — one of the crappiest weapons in the game in my opinion. The short sword is a Light weapon with one sharpness star (which as we will see, means it does Medium harm). It’s length is 3, making it one of the shortest weapons in the game, but it’s meager reach is higher than that of many of the creatures of the realm. On it’s alerted side, you can see that nothing changes. It is no better alerted than when unalerted.

Compare this to the mace, which is the weapon with which the infamous Black Knight starts the game. The mace does Medium damage, which is similar to the Light, but sharp short sword. The mace’s length is 1, which is nearly the shortest in the game. Still higher than most creatures, but the short sword has the advantage. However, we can see that, when alerted, the mace’s speed is 3, which is pretty fast. In fact, if you look at the Captain’s chits, that 3 speed is as fast as the fastest FIGHT chit, the Captain can play — his FIGHT M3**. It might not look like much now, but that is a huge advantage for the mace, and plays very heavily into the tactics used by a character that wields one.
Onward to Battle!
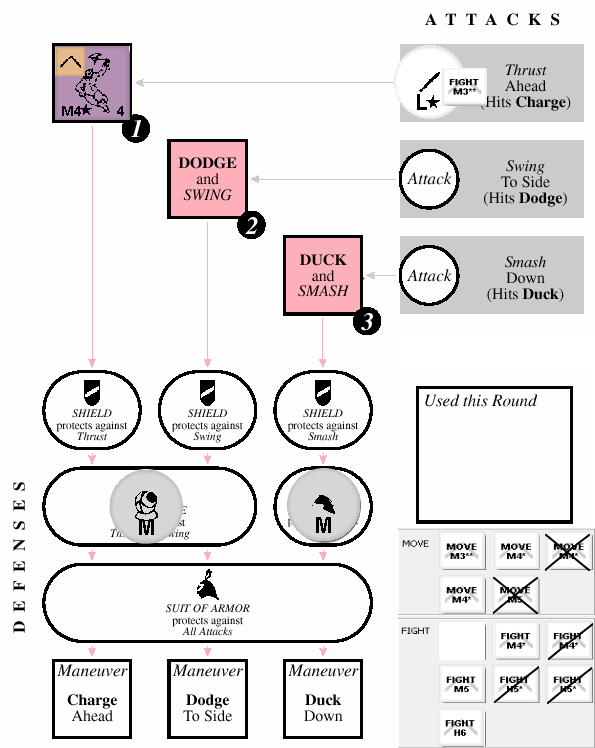
So, in a nameless clearing in the Magic Realm, a unarmored Captain faces a lone axe goblin. The Luring, Random Assignment, and Deploy steps are there to determine which denizens and NPCs attack which characters. For this first battle, we will mostly ignore those steps. The Captain isn’t hidden, and so he lures the goblin to his sheet — in other words, the goblin will be attacking the Captain every round. After I awkwardly throw all my counters on there for you to see, our sheet looks like this:
The Action Step
The action step is where we need to make our first decision. There are several things we can do on our action step, but as a fighter, the main options we need to consider are:
- Do we run?
- Do we alert our weapon?
- Can I play a FIGHT chit to undercut the opponent’s move speed?
- Can I play a MOVE chit to ensure I am not undercut by the opponent’s fight speed?
- Who attacks first this round?
- Should I cover my MOVE in case my opponent intercepts me? (What happens if my opponent hits me?)
- Can I avoid fatigue this round?
Undercutting Your Opponent
There are two ways to hit your opponent in Magic Realm. The first way it to undercut him, by playing a FIGHT chit with a speed less than his move speed. If you do this, you automatically hit your opponent that round, regardless of how he moves in the Tactics step. If we can guarantee a hit, we often should… but that depends on other considerations that come later.
For now, it is enough to note that with his move speed of 3, we cannot undercut the goblin currently, even with our best FIGHT chit (M3**). Of course, if the goblin flips during the Tactics step, we could undercut with our FIGHT M3**, but there are some other things to consider, and as you will see, there is no need to undercut the axe goblin.
Not Getting Undercut
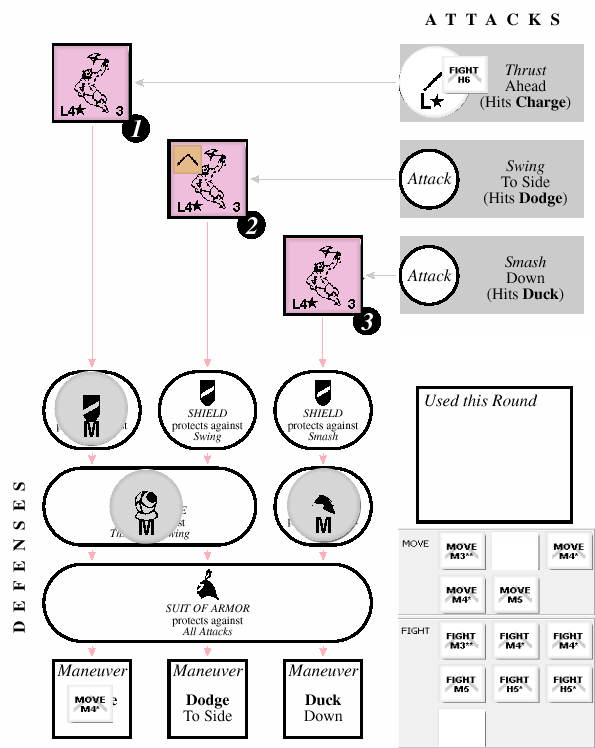
Of course with his L4* attack, the goblin can undercut us if we don’t play a MOVE chit with a speed of 4 or better. Though it is sometimes ok to be undercut, it is often a bad thing, and in this case we want to avoid it. We will be playing one of our MOVE M4* chits to avoid being hit.
Who Attacks First?
This question is pretty important for this battle. Because it is the first round of combat, weapon length and then attack speed determines who attacks first. Our short sword has a length of 3. The axe goblin has a length of 2 (from the monster chart in the book). So, in the first round of battle, we attack first, which is a good thing.
In the second and subsequent rounds of battle, the importance is reversed. Attack speed determines who attacks first, but on attacks of equal speed, weapon length determines who has initiative. So, on later rounds, if we play a FIGHT with a speed of 5 or 6, the goblin goes first. If we play a FIGHT of 4 or better, we go first.
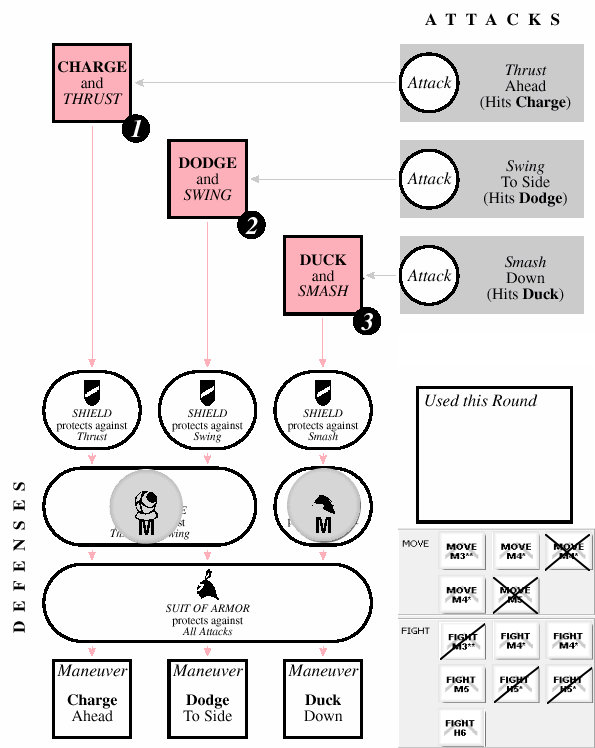
So… the nice thing is, because we cannot undercut the goblin, and this is the first combat round, we go first, no matter how slow our FIGHT chit is. We might as well play our slowest, heaviest, least fatiguing FIGHT chit. So, we will play our FIGHT H6… the question is where?
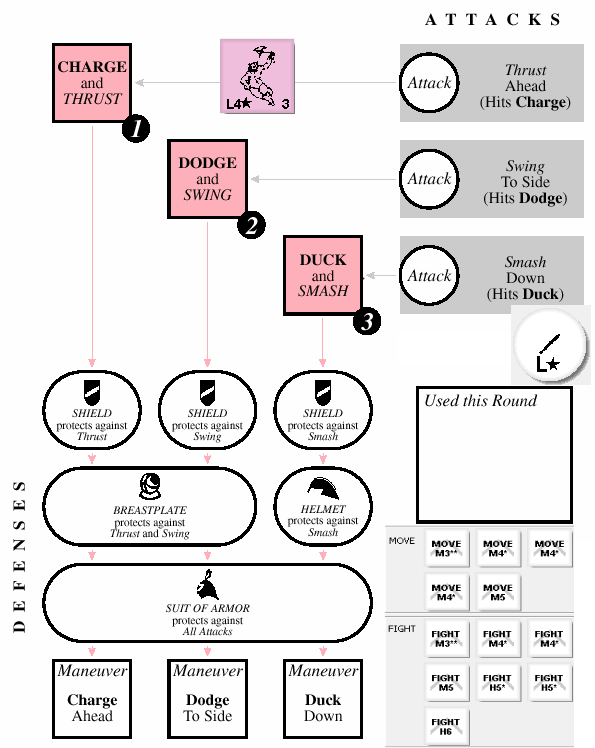
Intercepting Your Opponent
So far, we have determined that we are playing our MOVE M4* chit and our FIGHT H6 chit. The only question we have now is whether we will cover our move or not. This has to do with the second way to hit an enemy in Magic Realm, intercepting his maneuver. So, after you place your chits, and the Tactics step moves (and flips?) the enemies on your sheet, if your attack lines up with your target’s red box (ex. you played Thrust and he is in Thrust and Charge), you intercept and hit him. Also, if your opponent’s red box lines up with your maneuver (ex. he ends up in Duck and Smash and your maneuver is Duck), he intercepts you and hits you.
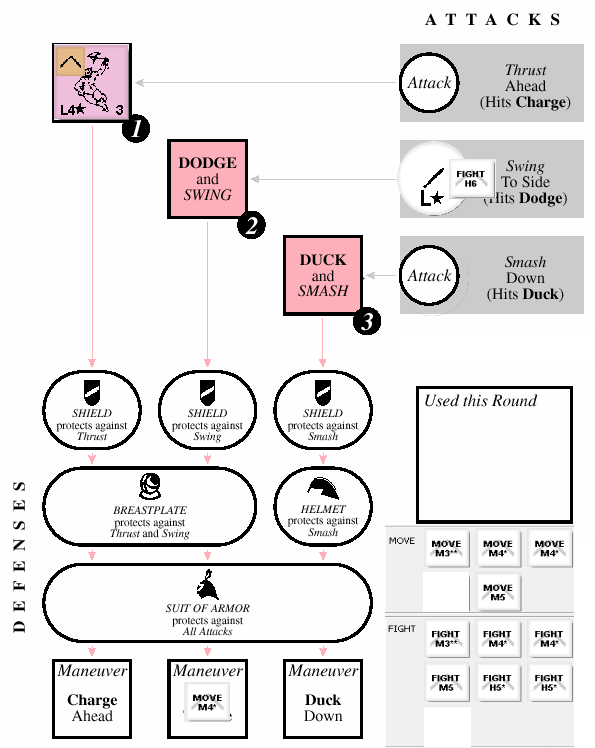 |
| We are playing our chits to cover our move |
Covering Your Move
Here’s the thing, you can’t control whether you will intercept your opponent. The red box your opponent ends up in is entirely random, so you have a 1/3 chance to intercept each round. What you can control is whether you will intercept him if he intercepts you. To do this, you play your FIGHT in the attack circle that corresponds with the maneuver in which you played your MOVE. Playing this way is called covering your move.
So, if I play my MOVE in the Charge box and my attack in the Thrust box, I have covered my move. If my targeted opponent ends up in the Thrust/Charge red box, he will intercept (and thus hit) me, but I will also intercept (and thus hit) him.
You generally want to cover your move if:
- Your target is a dangerous opponent and
- You will attack before your target this round and
- You can kill your target
- Your target is dangerous and
- You will attack after your target or
- Your attack will not kill your target
 |
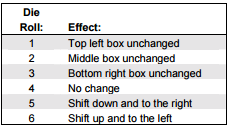
| Position Step |
 |
| After Repositioning |
 |
| Goblins 1&3 Change Tactics |
- If the attack has sharpness stars, one of the stars is removed (if it has none, the harm is not reduced)
- If the resulting harm exceeds the weight, the armor is destroyed
- If the resulting harm equals the weight, the armor is damaged and flipped
- If the resulting harm is Medium or greater, the character is wounded
- First, we remove a sharpness star, making the attack a Medium harm attack
- The Medium harm does NOT exceed the shield’s Medium weight
- The Medium harm DOES equal the shield’s Medium weight, so the shield is flipped to the damaged side
- The Medium attack wounds the Captain — which is great considering that without armor, that blow kills him
 |
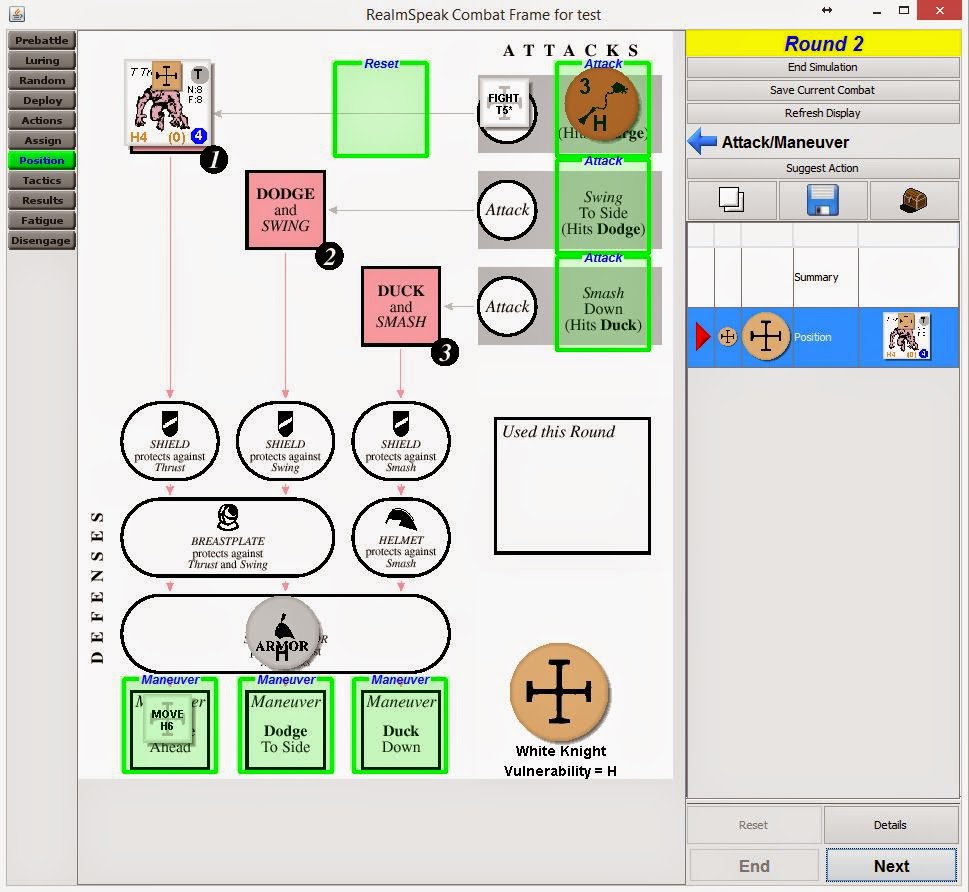
| Round 2 Position Step |
 |
| Round 2 After Repositioning/Tactics Roll |
 |
| Round 3 Position Step |
 |
| I am hit again! |
- First, we remove a sharpness star, making the attack a Light harm attack
- The Light harm does NOT exceed the shield’s Medium weight
- The Light harm does NOT equal the shield’s Medium weight and thus the shield is unaffected
- The Light attack does NOT wound the Captain
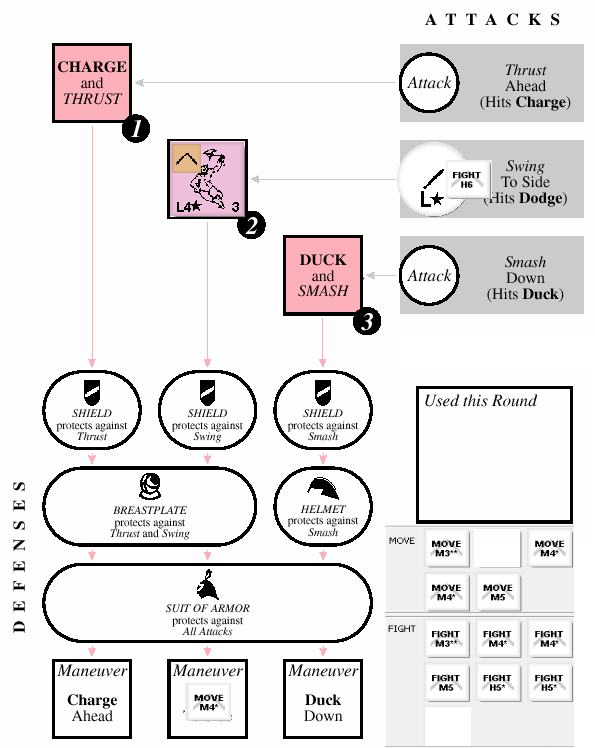
For the “Change Tactics” roll, you roll two dice and take the highest one. The chance of one of result coming up a six (meaning either die is a six), is 11/36 or 30.6%. So, here is the breakdown of my chances:
- 48.2% No one flips, we kill our target and take no damage from the second. This is the best-case scenario
- 21.2% Our target remains dark-side, but the other guy flips. We get our kill, but the second goblin wounds us.
- 14.1% Our target flips to light-side, but the other guy remains. We don’t get a kill, but aren’t harmed either.
- 7.1% Our target flips to light-side, but the other guy remains. However, we intercept our goblin and kill him anyway.
- 6.3% Both goblins flip. We miss our target and are wounded by the second goblin.
- 3.1% Both goblins flip, but we intercept our target and kill him anyway. We are still wounded by the second goblin.
- 33.3% We intercept our target, kill him and are not hit
- 33.3% We don’t intercept our target and we are not intercepted
- 23.2% We don’t intercept our target and are intercepted by the second goblin. However, he remains light-side up and does no damage
- 10.2% We don’t intercept our target and are intercepted by the second goblin who flips and wounds us
 |
| Round 4 Position Step |
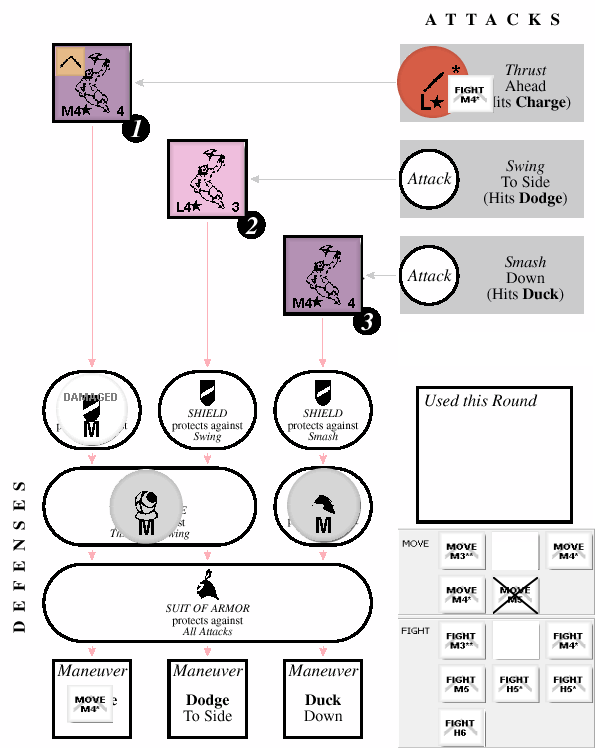
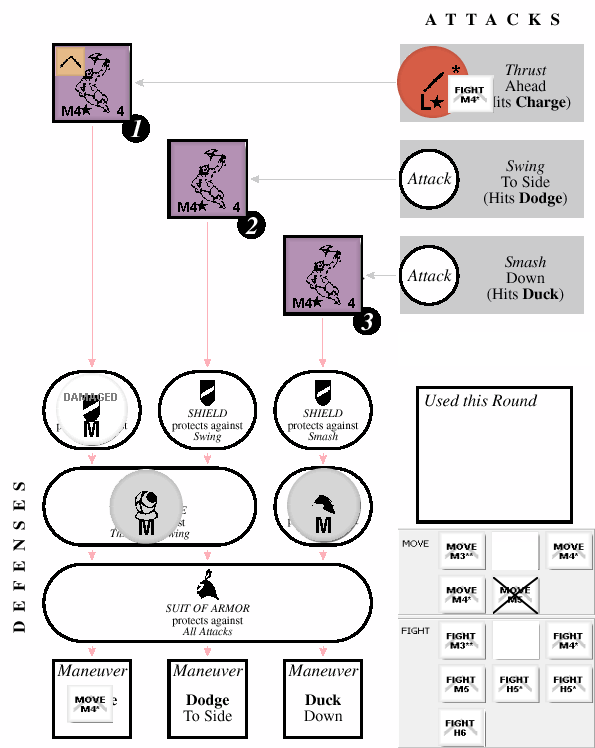
Our repo roll is a 3 so the bottom right box is unchanged, meaning we flip boxes 1 & 2. We roll to change tactics and the goblin who ends up in box 1 flips with a 6/4. The goblin in box 2 does not flip.
 |
| Round 4 After Repositioning |
Not the worst thing that could happen, or the best. Let’s resolve attacks now. Our attack goes first because it is the fastest. Even though we don’t intercept our target, we undercut his move speed of 4 with out attack speed of 3 and so we hit, doing M* damage, and kill him. Our weapon becomes unalerted.
The goblin in box 1 “undercuts” us because we didn’t play a MOVE chit. He does M* harm, which reduces to M because it hits armor. However, that harm is enough to damage the shield again — which destroys it. The M harm also wounds us.
We played two asterisks this round, so we will have to fatigue. Because both of our asterisks were on a FIGHT chit, we have to fatigue a FIGHT. We choose one of our remaining FIGHT M4*. We also have to wound a chit. We choose one of our MOVE M4* chits.
Round 5
 |
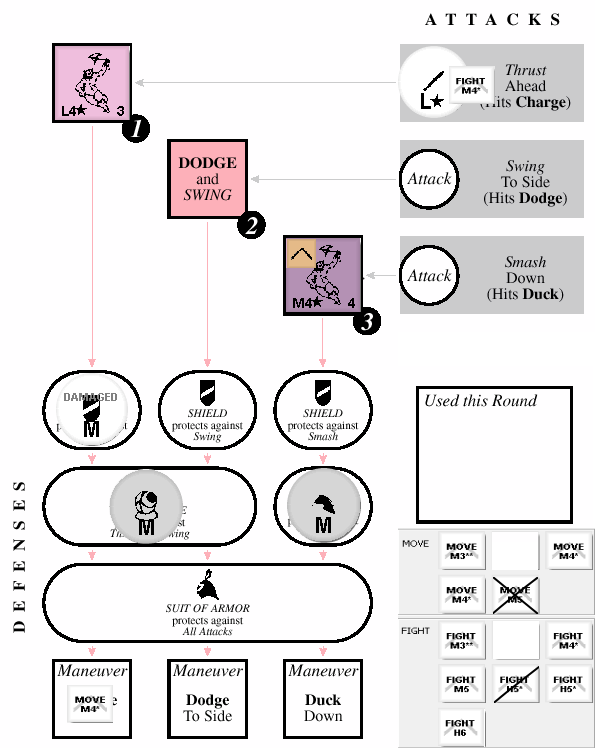
| Round 5 Position Step |
We are down to our last goblin, and hoping for a quick end to this costly battle, I go with the FIGHT M3** again. When we roll for repositioning, we get a 2 which swaps boxes 1 & 3 and leaves the middle unchanged. More importantly, our target does not change tactics. This means that when we resolve attacks, we undercut and kill our target before he can wound us.
We have to fatigue a FIGHT again and I will fatigue the FIGHT M3**, making change by bringing our FIGHT M4* back into play. And then the combat is over. We ended up with two wounds and four asterisks fatigued. We also lost our shield. All in all a costly battle, but we felled three goblins.
 |
| We are beaten and bruised, but alive! |
We will end this tutorial here. Hopefully, you have enjoyed it and learned something. We will continue this soon, adding tremendous monsters, multiple combatants and natives into the mix! If you have questions or comments, please feel free to post them.
Magic Realm Combat Part 2 — Weapon Speeds and Hiding
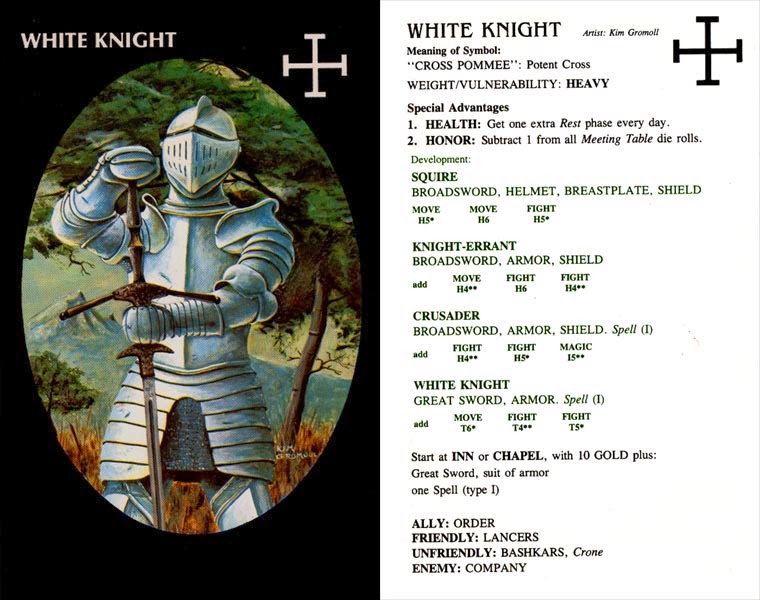
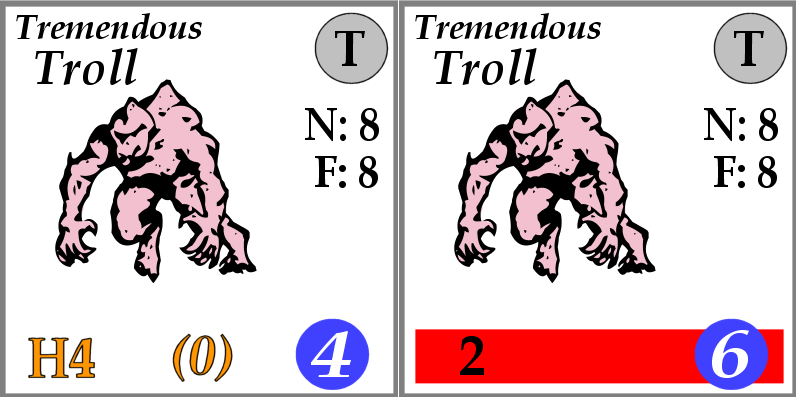
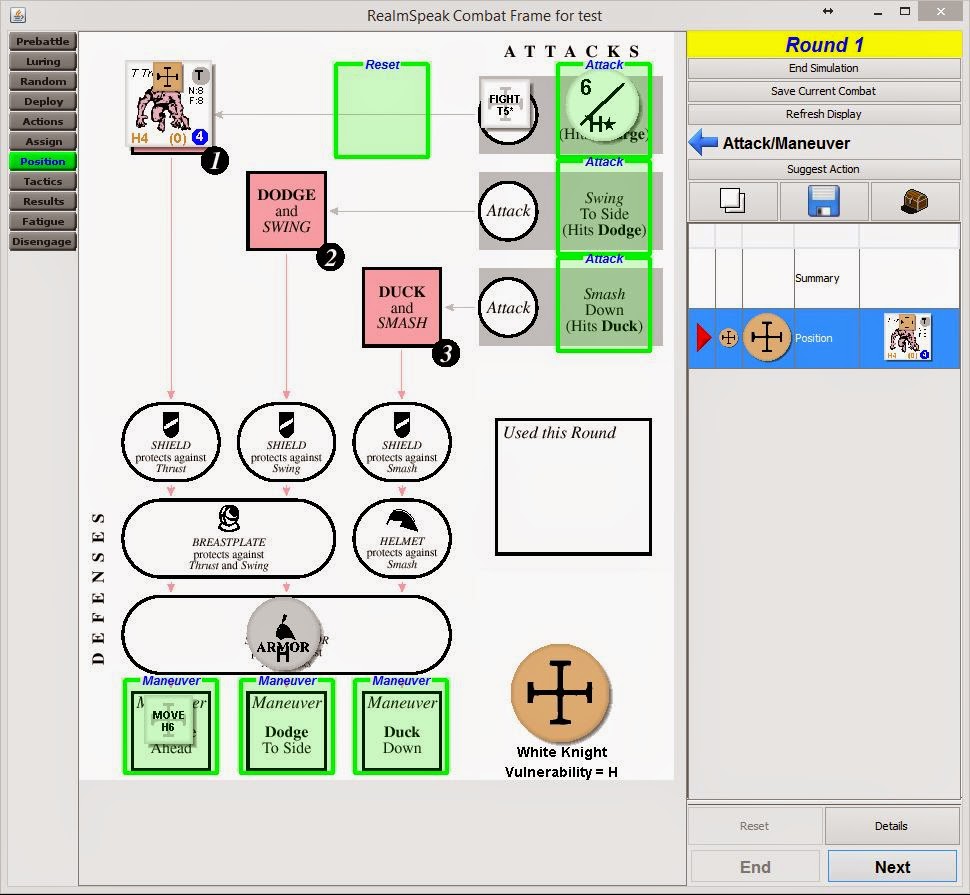
Today we are going to run a couple quick battles with the White Knight. We will use the stalwart knight to focus on the concepts ofweapon speeds, alerting, and hiding as they pertain to MR’s combat system. We will also get a look at tremendous monsters and the special threat they pose.
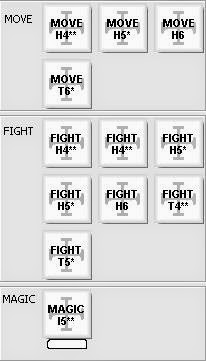 So first, let’s set up a meeting between the powerful, but slow White Knight and a lone giant. First, let’s take a look at the White Knight and his chits.
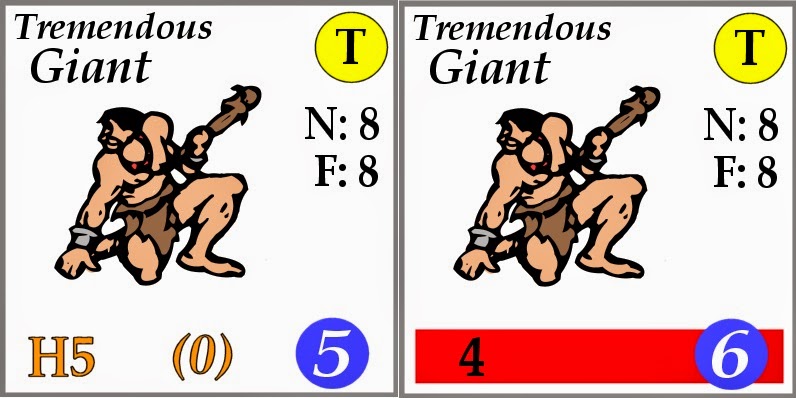
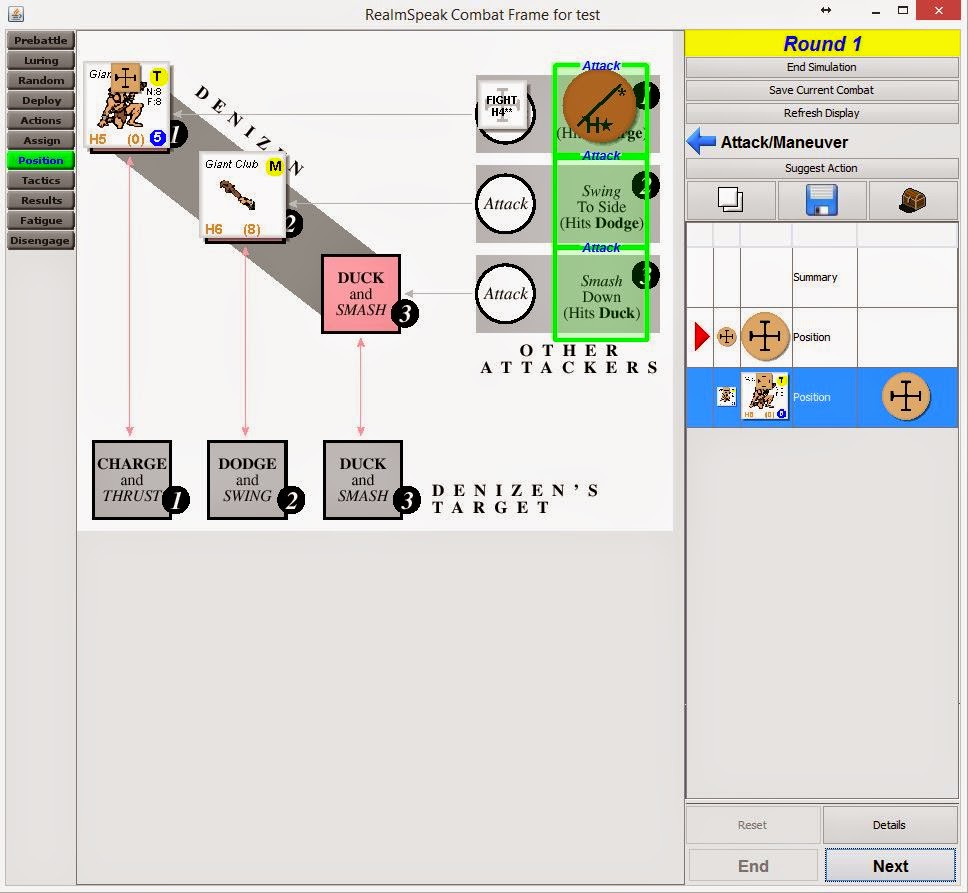
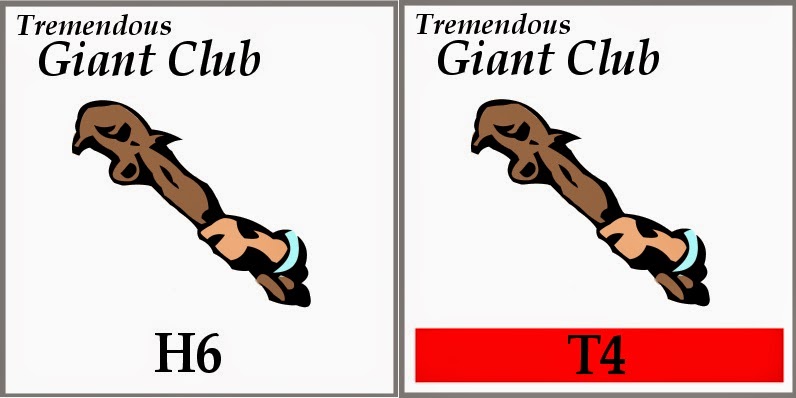 In addition, giants have a special club attack. The club is played on our sheet as though it were a second monster. We cannot attack it, but it can attack us. This means that the giant gets two shots at us each combat round. It also makes the tactic of covering our move less effective, since the giant still has a chance to hit us without getting hit by our covering attack.
 |
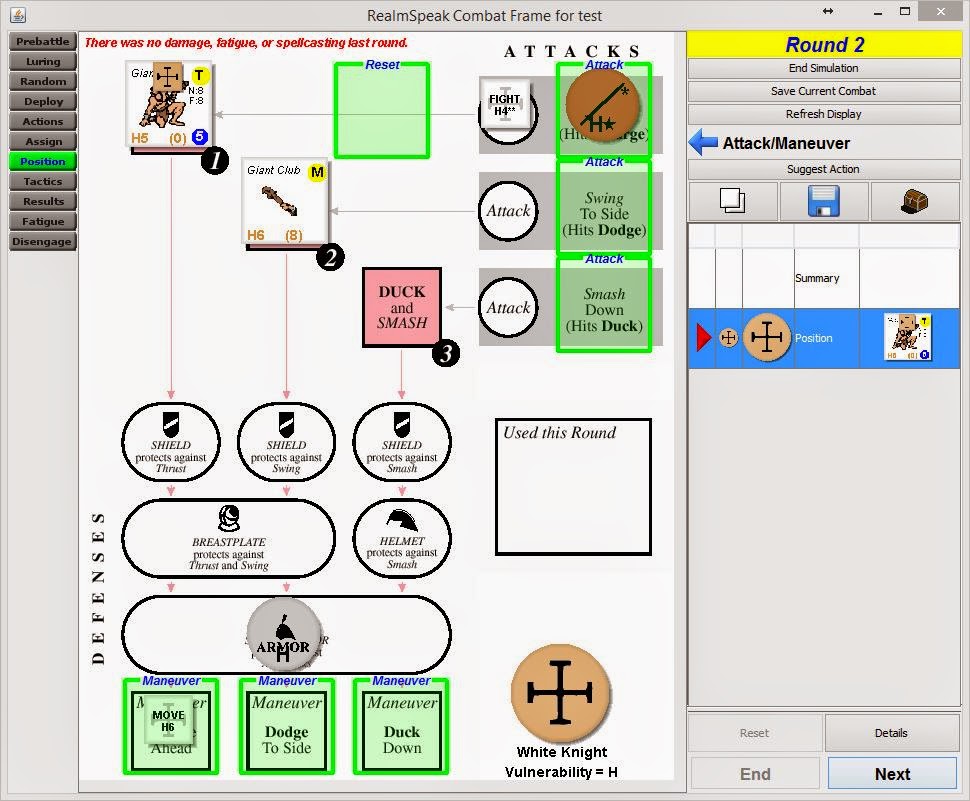
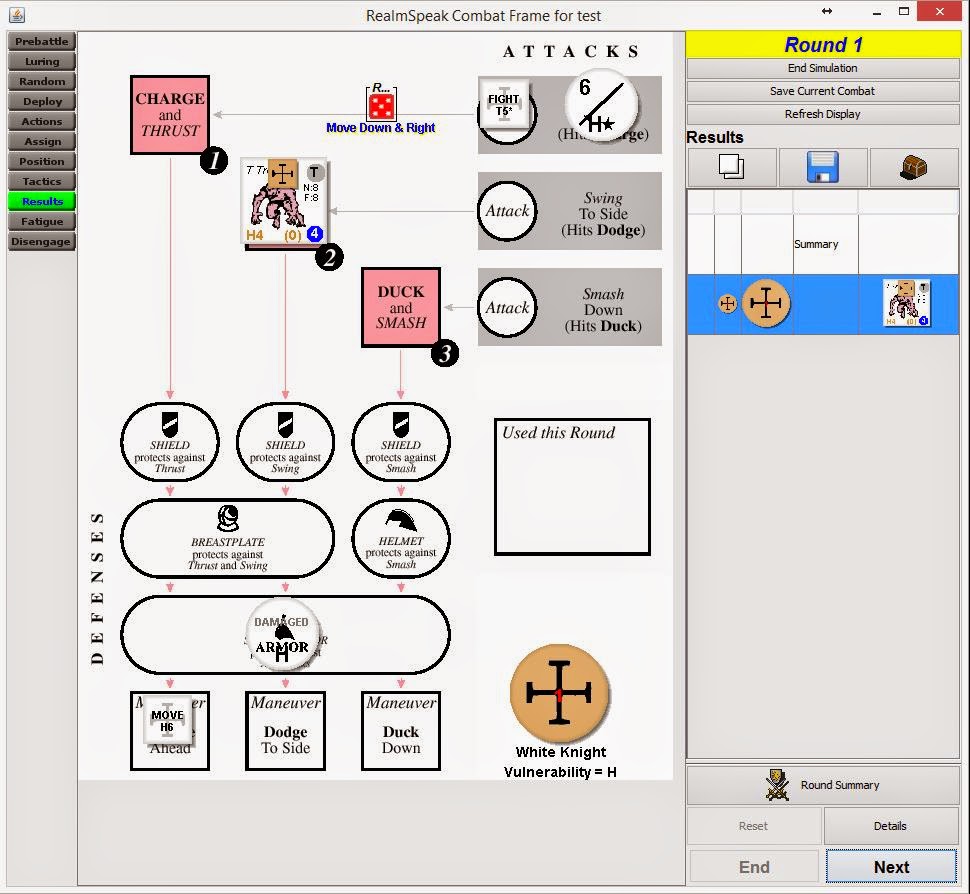
| Round 1 — Position Step |

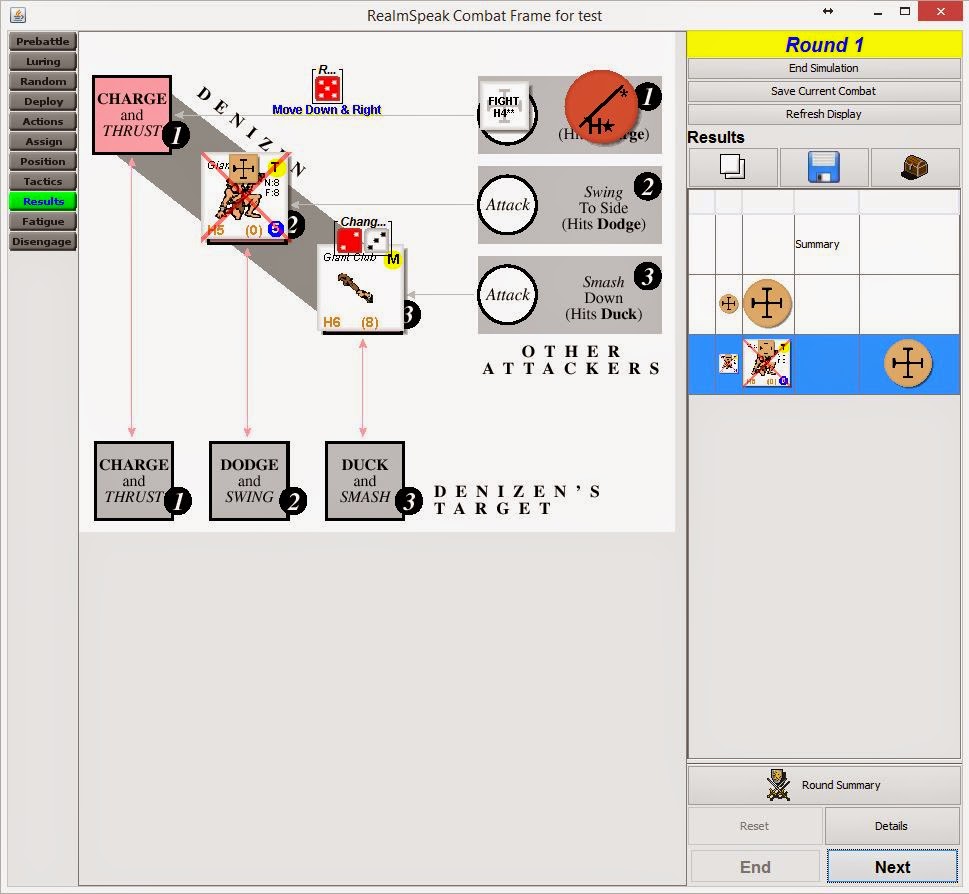
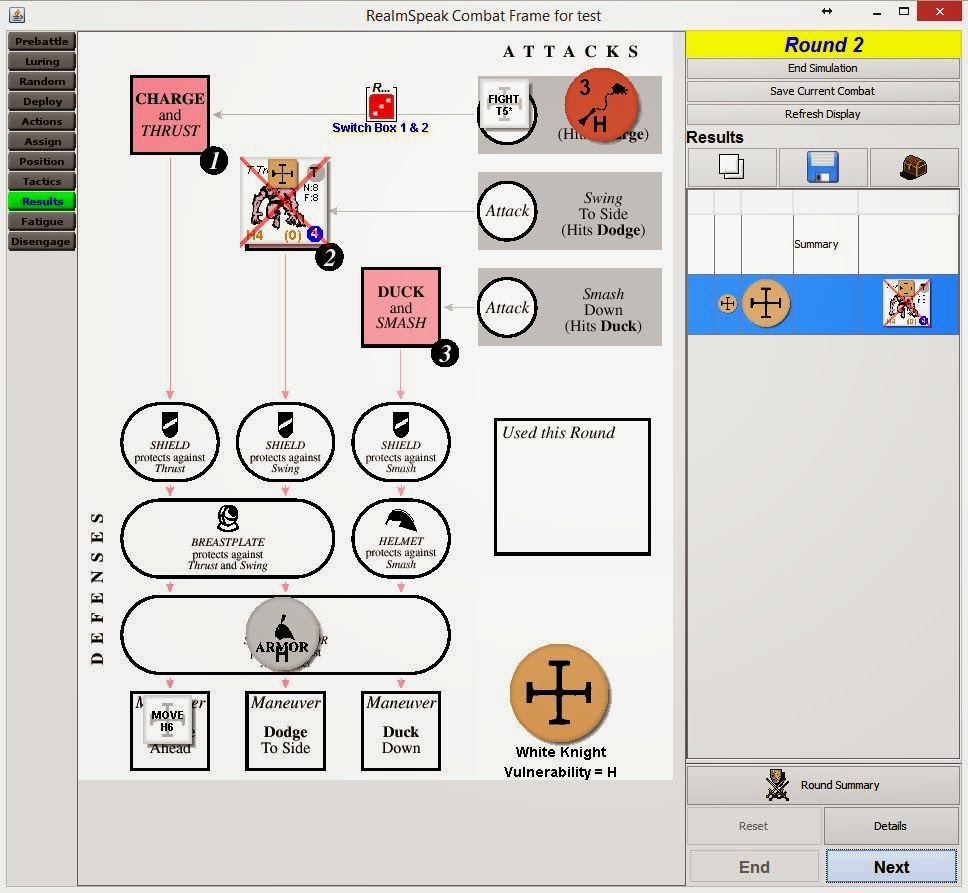
 |
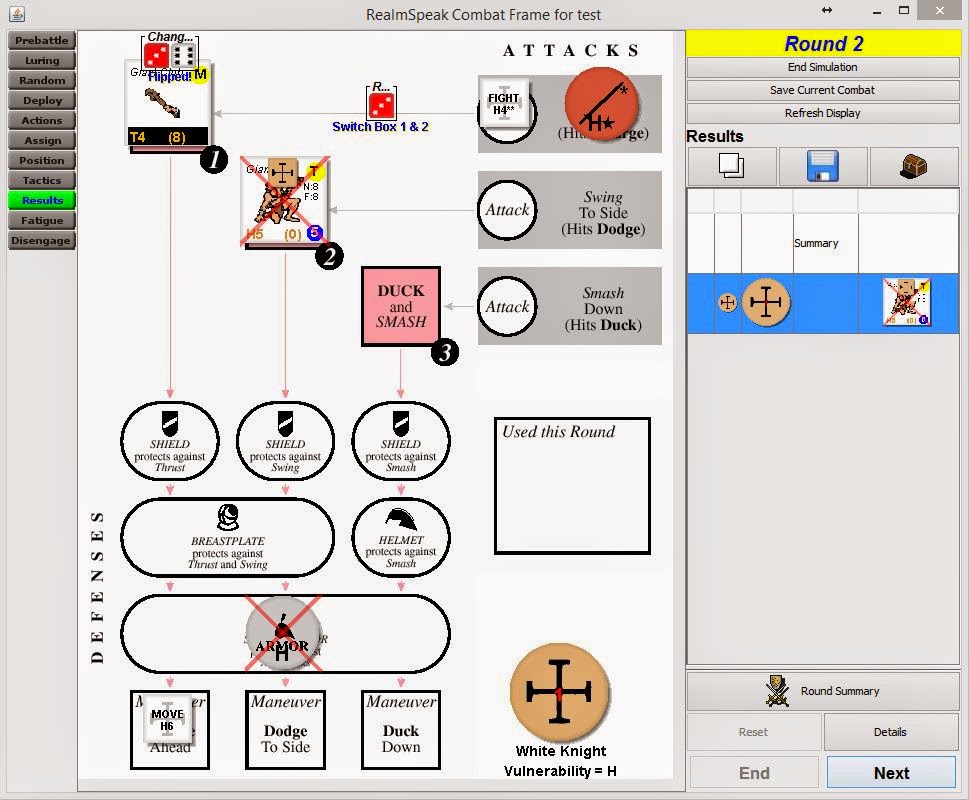
| Round 1 — Results |
 |
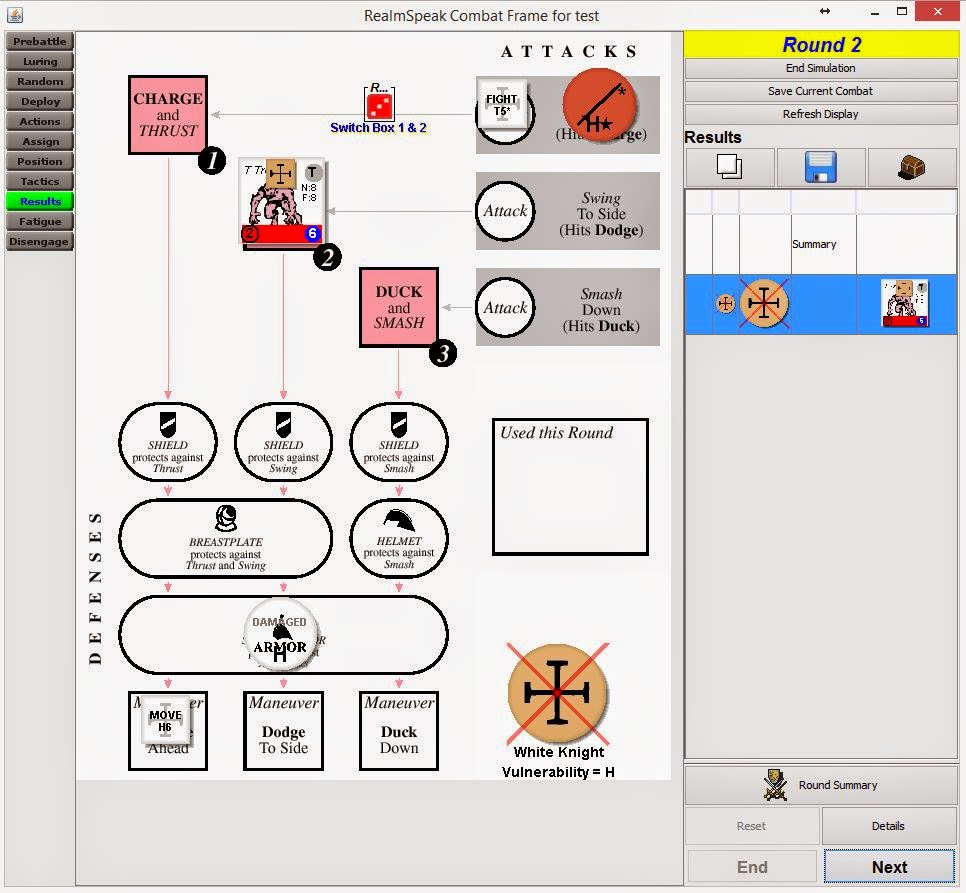
| Round 2 — Position |
 |
| Round 2 — Result |

 |
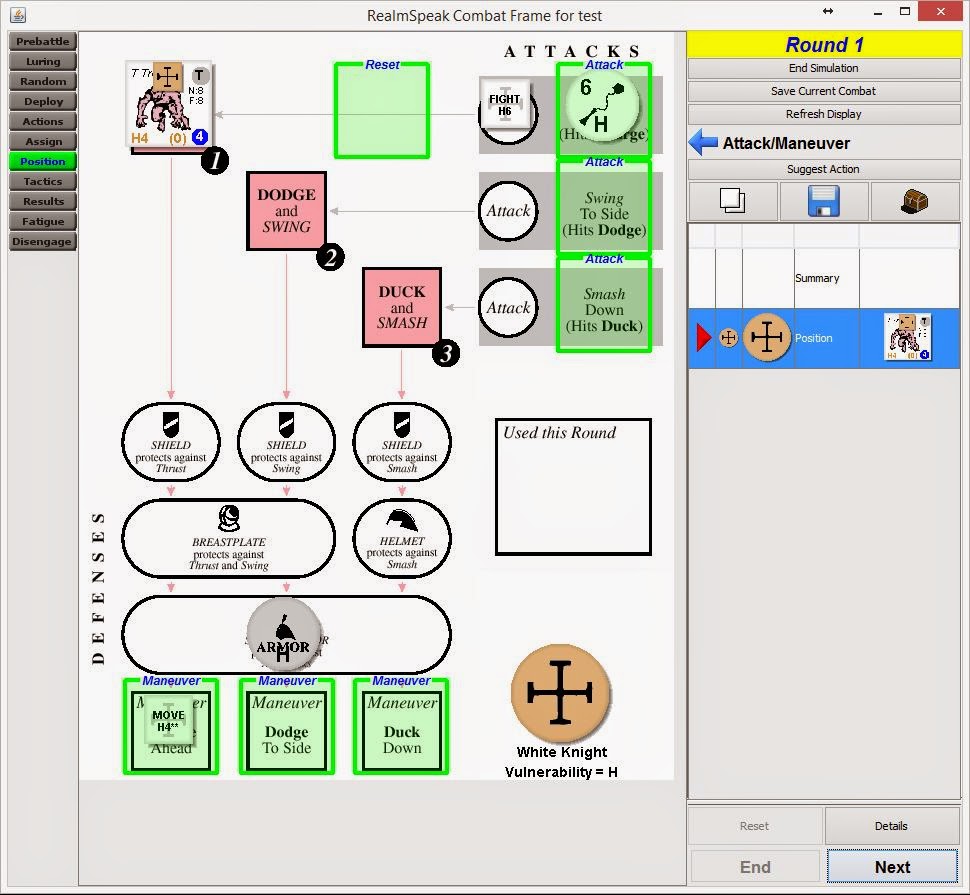
| Round 1 — Position |
 |
| Round 2 — Result |
 |
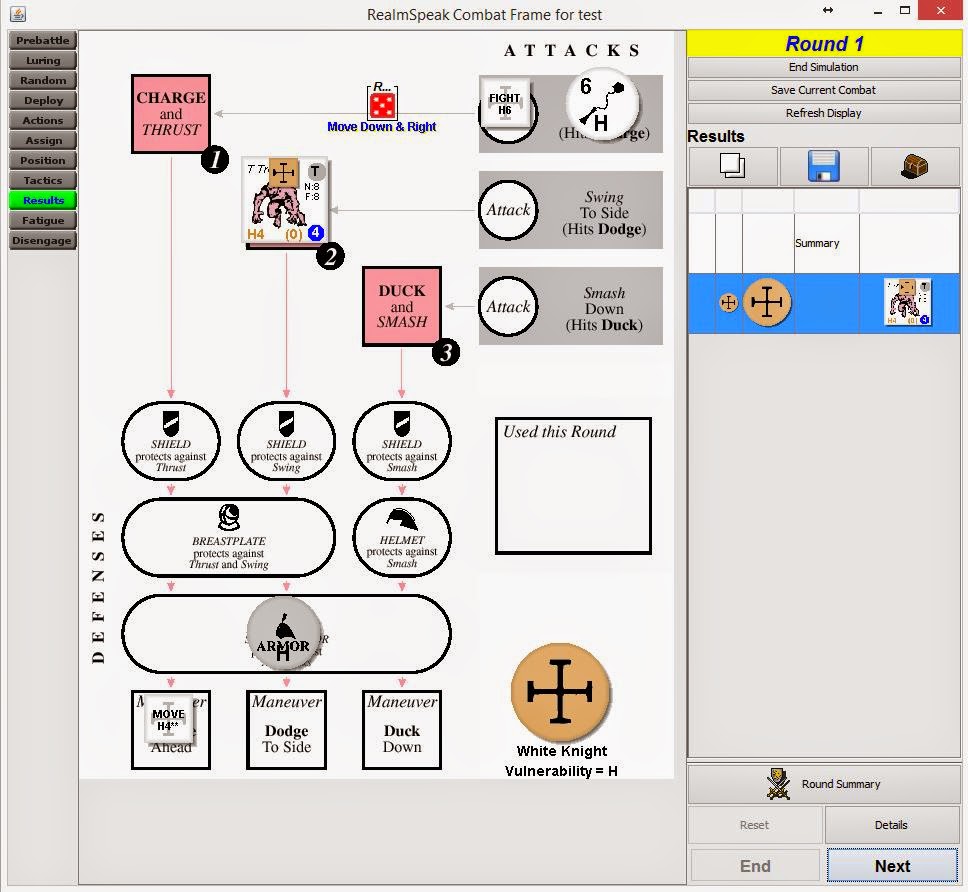
| Round 1 — Position |
 |
| Round 1 — Result |
 |
| Round 2 — Result |
 |
| Round 1 — Position |
 |
| Round 1 — Result (everyone missed) |
 |
| Round 2 — Position |
 |
| Round 2 — Result |
We win, because the morning star is awesome. This is why after-action reports with the White Knight often start with him trading with the Order to swap his great sword for a morning star. The alerted 3 speed is that much better than an extra sharpness star.
Still, even with a morning star, there is a 1/3 chance of dying, and a 1/3 chance of death is a little harsh. However, if you start the battle hidden, it becomes trivial if you start it hidden. Starting hidden, allows you to alert the morning star during your Action step, and devastate the Troll with a speed 3, tremendous harm attack without him even getting to target you.
Next installment, we will bring some hirelings along and see how that goes.
Magic Realm Combat 3 — Luring with Natives

This is the first part of a larger tutorial:
Quick tutorial today… we are going to battle with some natives on our side and talk about luring, deploying and battling on multiple sheets. Like last post, I am going to use RealmSpeak to manage the fight, which will make it a little easier on me… at the expense of being able to control the rolls. We’ll see how it goes.
For the first battle, we are going to pit the Black Knight against two Heavy Trolls. This is a pretty good fight for the BK, though I would expect him to take a hit or two if he starts the battle unhidden. With a hireling, we should fare a little better. Let’s give the BK a rogue companion and see how we can use him.
One way we can use hirelings is to lure enemies onto their combat sheet, tricking the monsters into attacking them instead of us. Every hireling you have can lure a single enemy to his sheet each combat round. Having a native lure an enemy can save us wounds and fatigue, and to allow us to ignore our defense to play more aggressive attacks. The risk is that the native is killed in the process, which will cost us notoriety and keep us from our precious victory conditions.
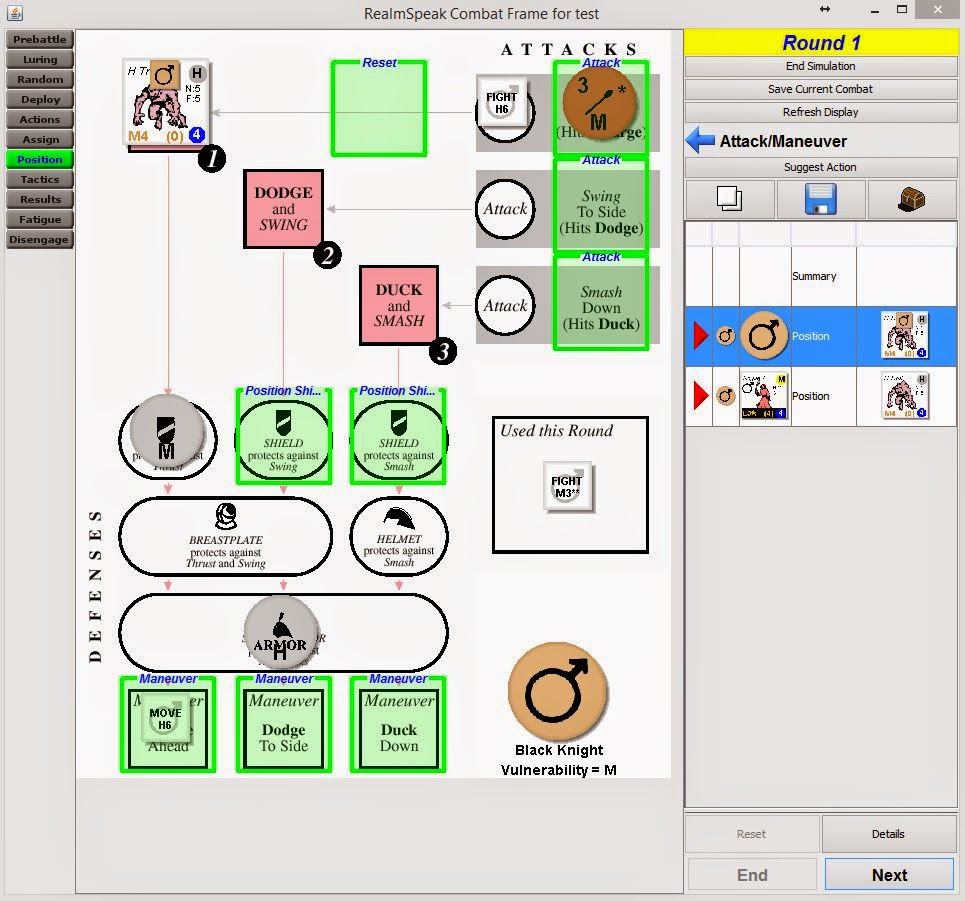
The Black Knight vs. Two Heavy Trolls — Round 1
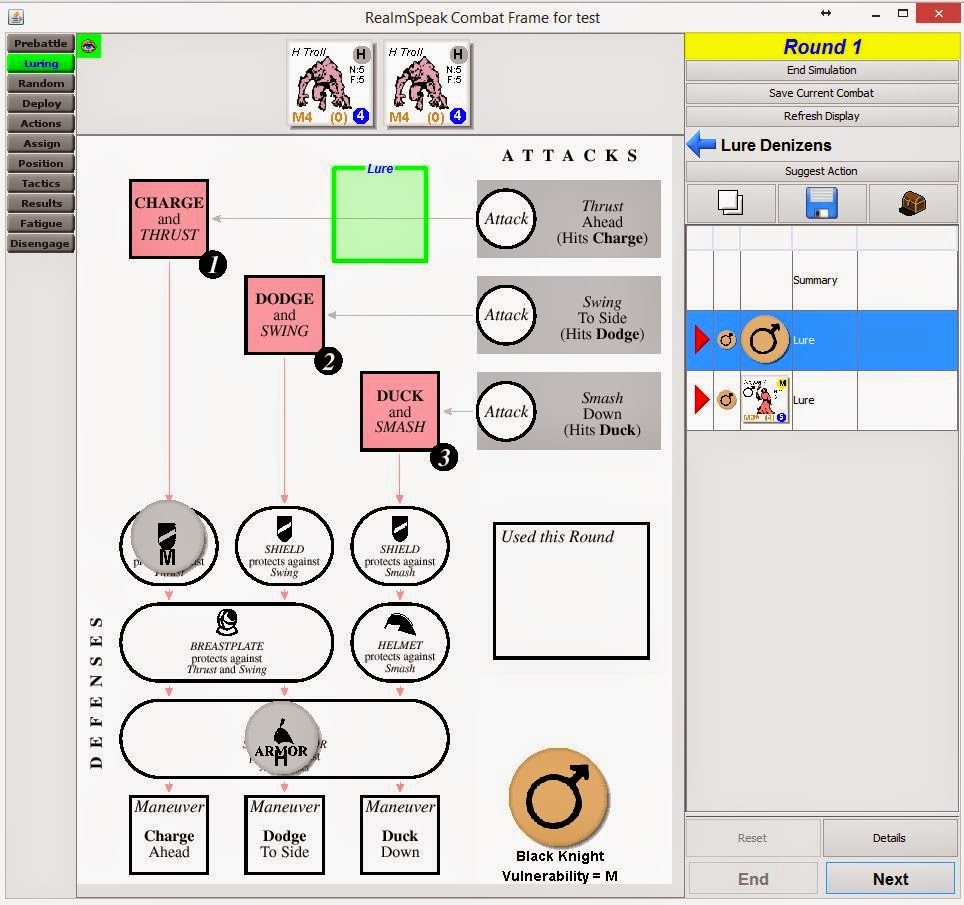 |
| Round 1 — Luring Step |
This is how we are going to use Rogue 7 in this battle — he is going to step in and take the first troll off our hands, allowing us to play an extremely aggressive attack on the second troll. To do this, R7 lures the troll in the Luring step.
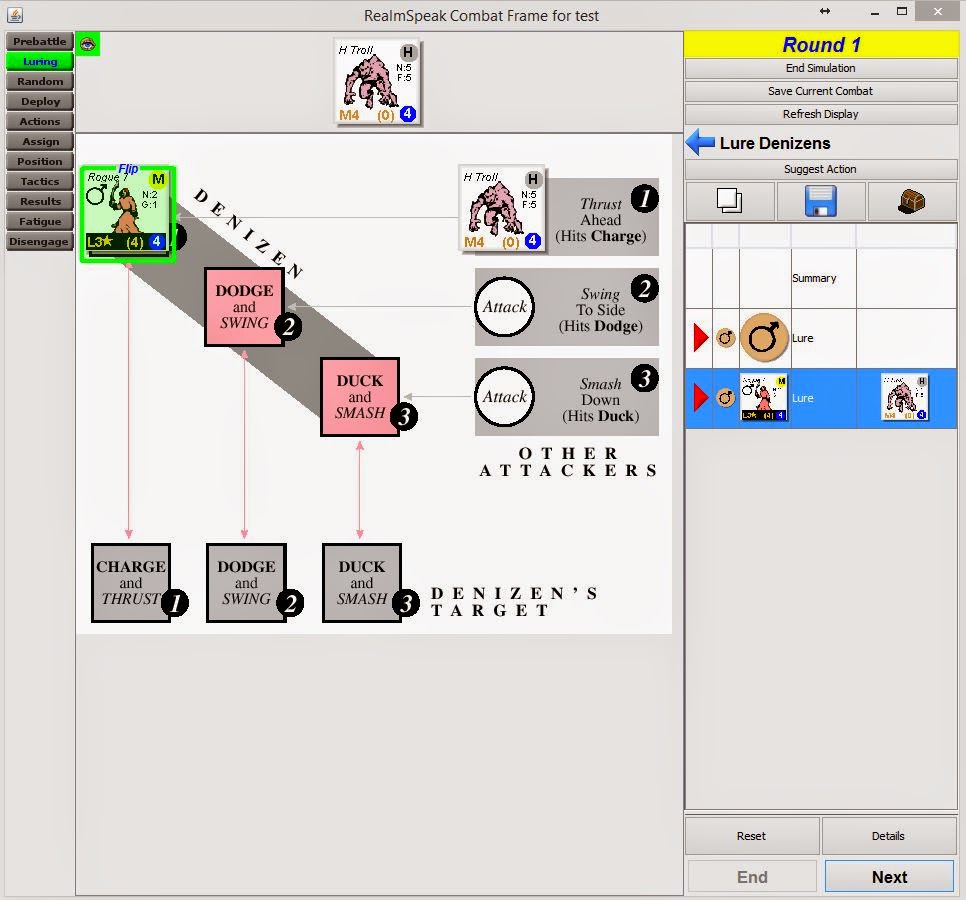 |
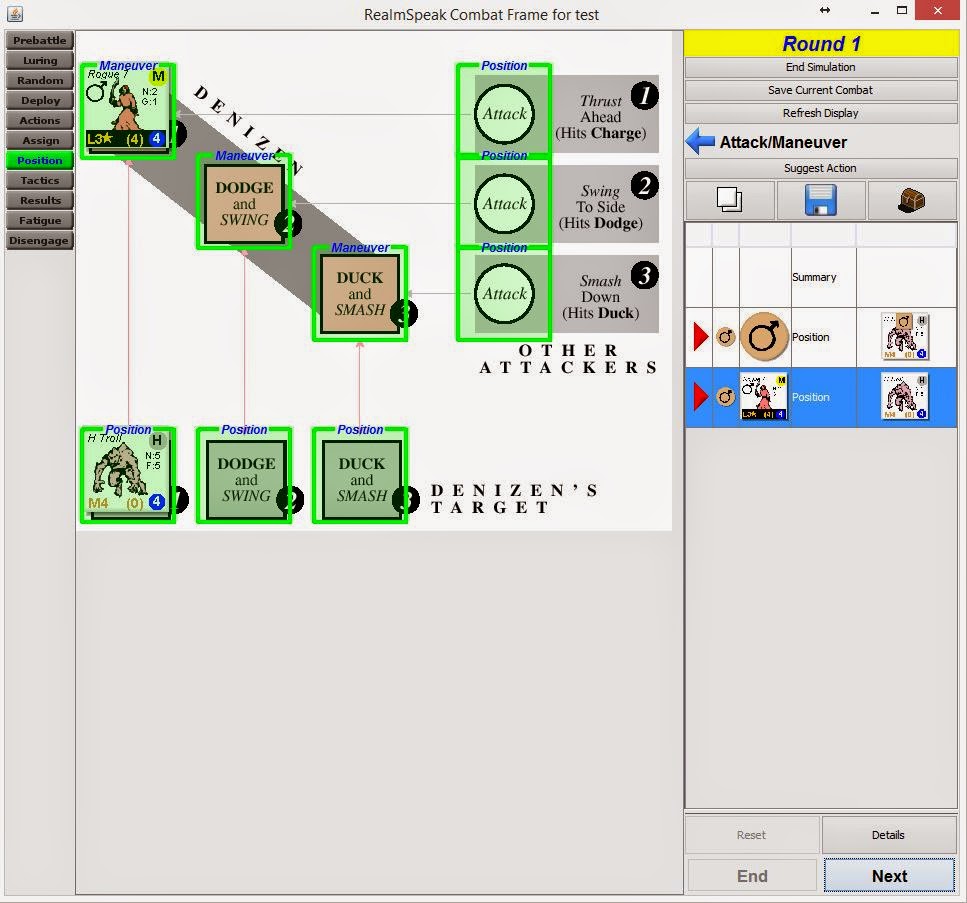
| Round 1 — The lured troll goes on R7’s sheet, not ours |
To lure the troll, we simply place him on our hireling’s combat sheet. Notice that we flipped R7 to his dark side. When we lure an enemy onto a hireling’s sheet, we can flip him to either side. Rogue 7 has a side with a M3* attack and a 5 speed move, and another side has an L4* attack with a 4 speed move. Neither of R7’s sides has an attack that can kill a troll who is heavy and armored, so we are going to play the side with the better move speed so that R7 does not get undercut and killed.
Once R7 has lured one troll, the other is deployed to our sheet. (If there were other characters in the clearing, they might have gotten attacked by the troll in the Random Deploy step.) So, R7 has a troll, as does the Black Knight. We are still going to have to withstand an attack this round, so did the native really help at all?

He actually helped quite a bit. Because we only have a single troll to worry about, we can play a highly aggressive attack in an attempt to kill the troll before he can even attack us. The first step in this attack is to play a FIGHT chit to alert our trusty mace. Unfortunately, trolls are pretty quick and so to alert our weapon, we are going to have to burn our FIGHT M3** — using all of our effort asterisks for this round!
No need to be alarmed though. We don’t need any more effort asterisks to undercut and kill our troll. The mace is a speed 3 on its alerted side, so we can play our slowest FIGHT chit, as long as it has a Heavy strength, we will hit and do enough damage to kill the hapless troll. So, we play FIGHT H6, and a MOVE H6 and the Black Knight will kill his troll this round.
 |
| Round 1 — Position Step, our sheet |
As for Rogue 7, it is just a matter of not getting hit. His move speed of 4 is fast enough to not get undercut on either of the Heavy Troll’s sides, so it really comes down to a 1/3 chance on a die roll to see if the troll intersects… in which case, the Rogue dies. So, in this case, it doesn’t matter how we play the combatants on R7’s sheet, he lives 2/3 of the time, and dies 1/3 of the time.
 |
| Round 1 — Position Step, R7’s sheet |
We roll a 6 for the reposition roll, which moves the Heavy Troll from the Thrust box, into the Smash box, and he does not flip (rolled 1/5). Our hireling stays where he is and does not flip because he lured the monster onto his own sheet. When a native is battling on his own sheet, he does not roll to reposition, or to change tactics. We control where he is played and what side he is played on. Keep this in mind, because when we deploy the native to a creature’s sheet, this will change. So, R7 stays in the Charge box and the troll misses.
We have to fatigue one FIGHT asterisk because we alerted our weapon with a FIGHT M3**. We choose a FIGHT M4* because it is useless in this particular battle.
Round 2
This round is even easier than the last one. We are going to follow the same basic plan in which R7 lures the troll onto his sheet.
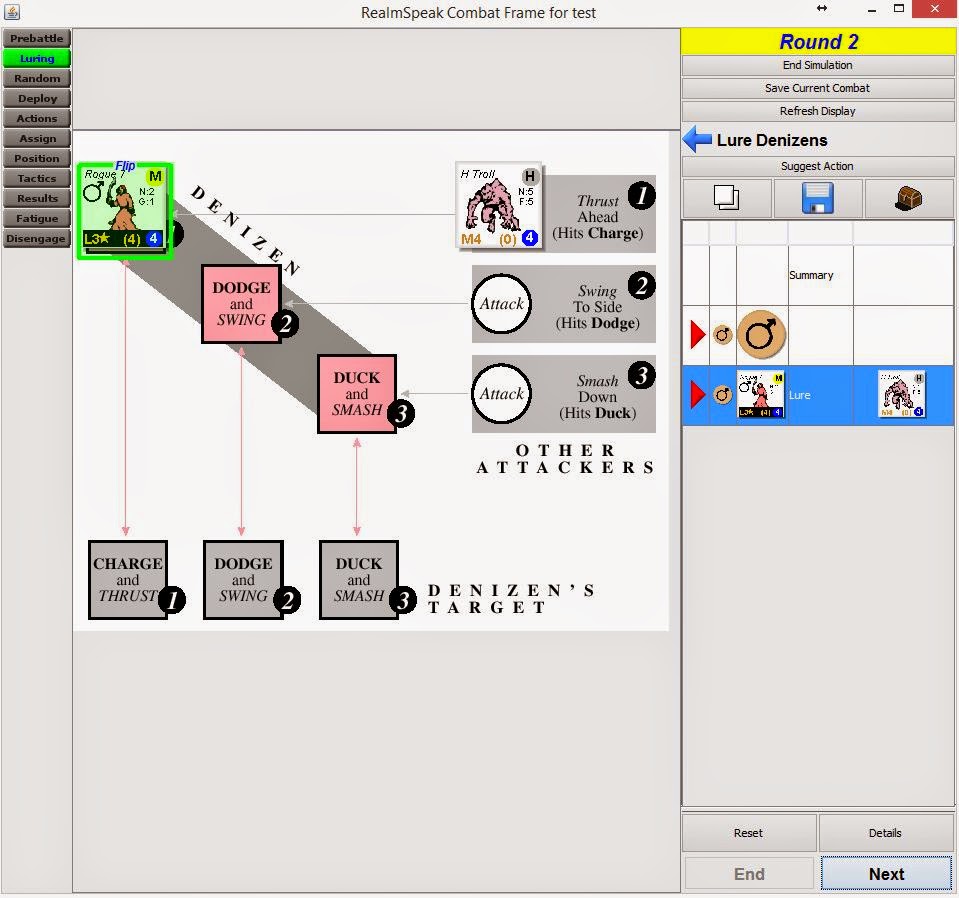 |
| Round 2 — Luring the troll onto R7’s sheet |
This round is better than the last one because the Black Knight has no enemies on his sheet and so he can alert his mace with any FIGHT chit he has. We pick a FIGHT M5, alert our mace, choose the troll as our target, and move onto the Position step.
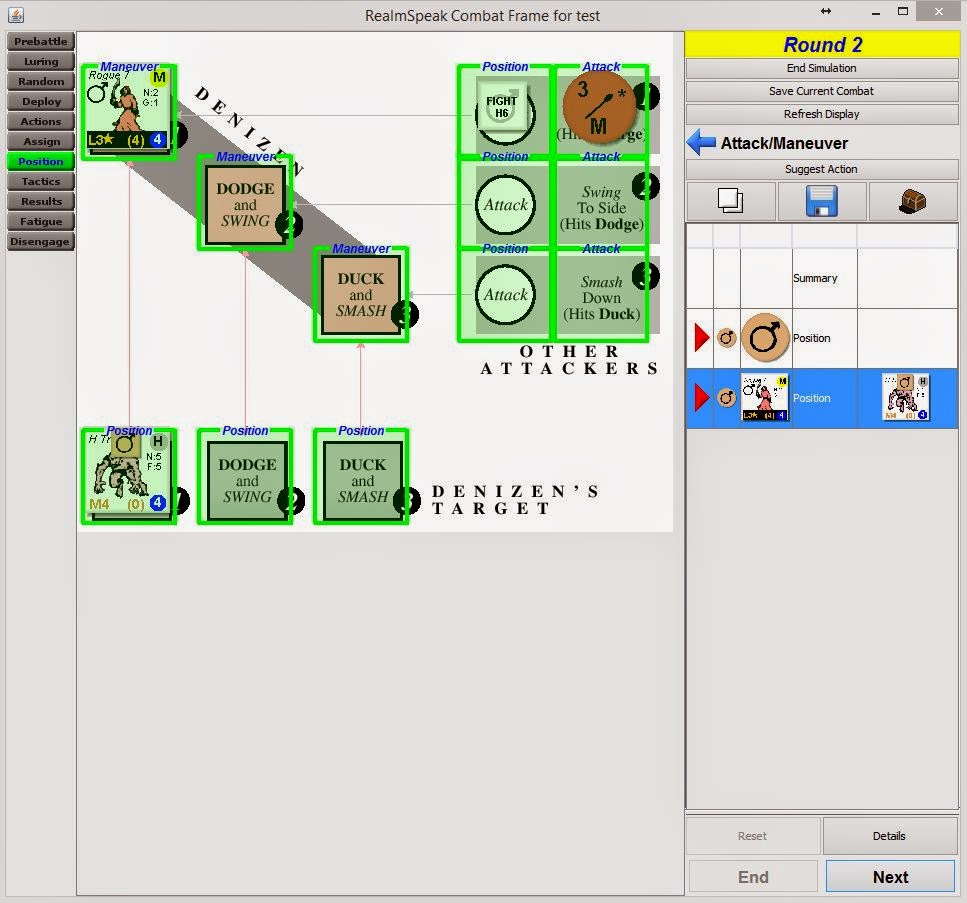 |
| Round 2 — Position Step, R7’s sheet |
Since he is targeting a creature on another character’s sheet, the BK plays his position step on R7’s sheet. If you are battling other players, you still play your moves on your own sheet, keeping your plays hidden from the others, but playing solo, on RealmSpeak, we actually play our move on R7’s sheet.
Our exact positioning doesn’t matter here, because we are going to undercut the Heavy Troll and kill him with a speed 3 attack. Since this is the second round of combat, our speed 3 is certain to go before the troll, and so this is an automatic kill.
 |
| Round 2 — Results |
Making good use of our hireling allowed our Black Knight to kill two heavy trolls by spending a single asterisk in fatigue. Could he have won that battle alone? Certainly, we could have even played our aggressive strategy, but it would have cost us 2 fatigued asterisks, a wound, and possibly a damaged or destroyed shield, or a damaged suit of armor… and Rogue 7 isn’t even that cool a hireling!
And to keep the concept of hiding (from the previous post in this series) fresh in your head… if the BK and R7 started the combat hidden, can you think of how you would play the battle to kill both trolls and take nofatigue or damage?
Magic Realm Combat 4 — Deploying Natives
This is the first part of a larger tutorial:
Today, we are going to go through the mechanics of deploying natives and how it differs from luring with natives. Besides horses and spell casting, deploying natives probably trips more people up than anything else in Magic Realm. Deploying natives isn’t hard, but there are a few strange bits in the rules, so we’ll go slowly and try to make everything clear.
 The Maiden and the Dragon
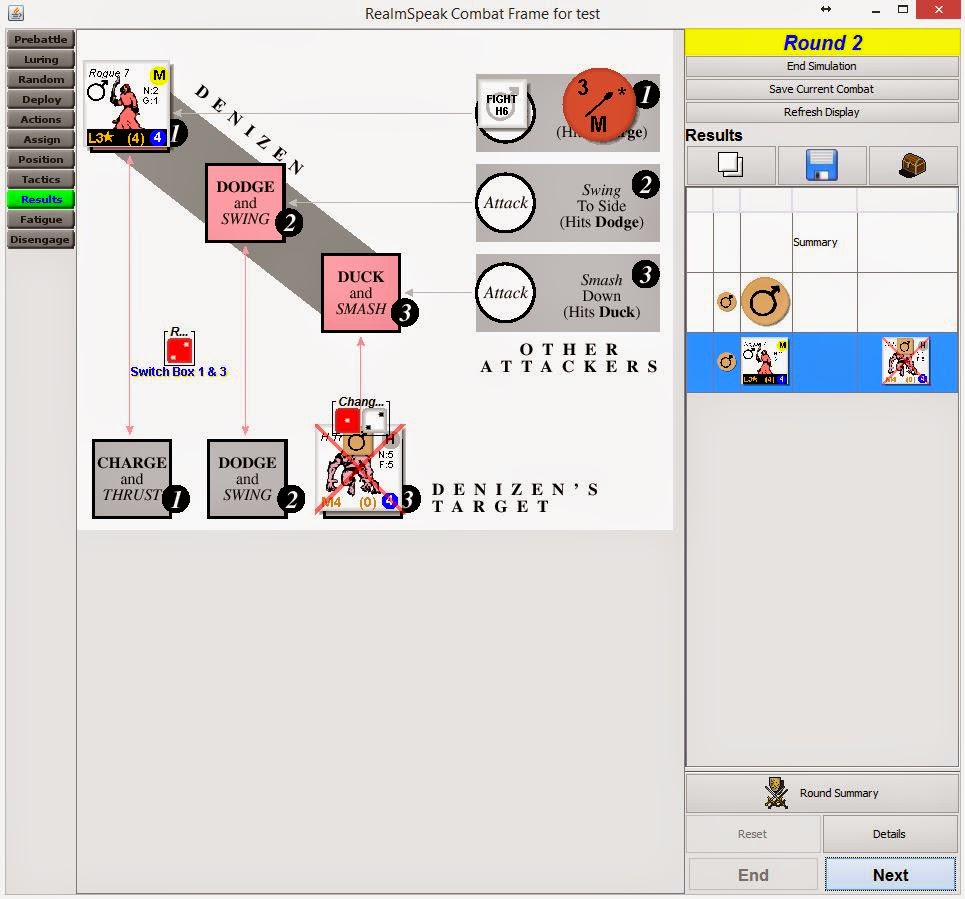
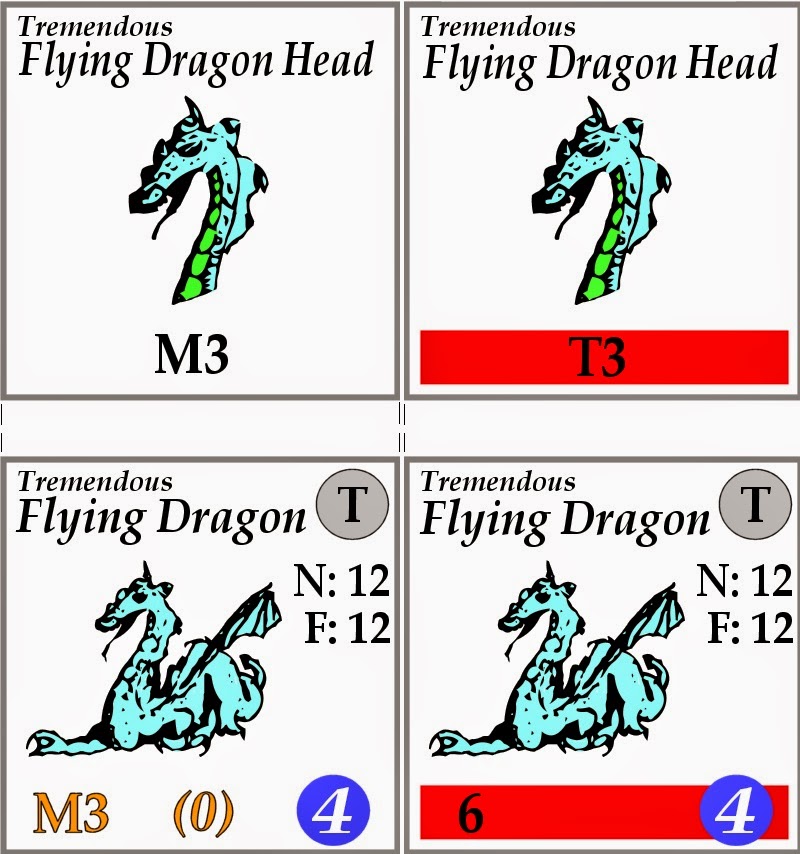
Before we do that, let’s ponder a match up between the Woods Girl and the Tremendous Flying Dragon. The Tremendous Flying Dragon is a powerful beast, strong enough to kill even the stoutest of warriors in the realm, while still being quick enough to evade their blows. Even though the Woods Girl can undercut the dragon and can do enough damage to kill it, this battle is generally a bad idea for her. Unless she is hidden, she should run. Why?
Both giants and dragons get extra attacks. The giants have their massive clubs, and the dragons have their heads. This means that, even though it cannot undercut the Woods Girl, the Tremendous Dragon will have two chances to intercept her maneuver, doing either medium or tremendous damage — enough to kill our heroine either way.
Of course, the Woods Girl brings her formidable bow to the battle, and when it is alerted, she attacks with the incredible time of 1. This means she will undercut the dragon and harm it before it even reaches her, right? Except now, she is subject to a roll on the Missile Table. An alerted bow normally does L** damage. Because the dragon is armored, one star will come off that damage, so we are doing L*. We need to do H* harm to kill the creature, so we will need a two-level damage increase — meaning we have to roll a 1. Thankfully, because of the Woods Girl’s skill at archery, she rolls a single die on the Missile Table, so her chance of increasing her harm to the needed level is 1/6 (versus 1/36).
Those are terrible odds — our adventuress has a 1/6 chance of killing the dragon and a 5/9 chance of being killed every round.
A Hail of Arrows
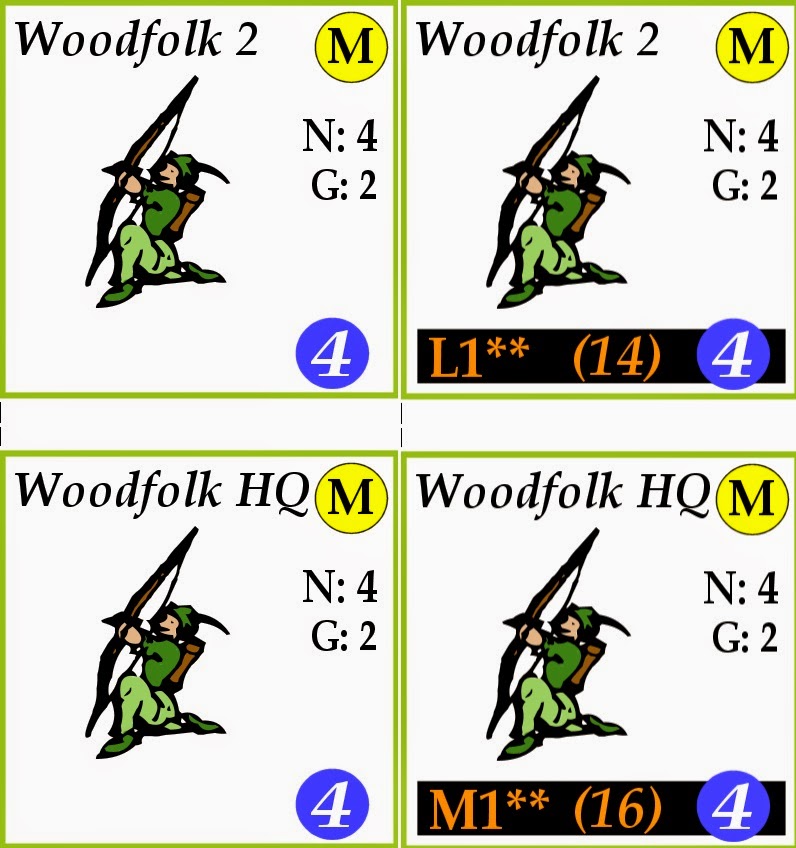
To give the Woods Girls more of a chance, we are going to have her bring her allies, the Woodfolk, to the battle. The Woodfolk is a group of three archers, two are similar in power to the Woods Girl, doing L** damage on a hit. However, the leader has a medium bow and so his damage is M**.
This changes things considerably. Instead of one chance of killing the dragon, we now have 4 shots at him. Like the Woods Girl, the native archers roll only a single die on the Missile Table, which means a roll of a 1 (or a 1 or 2 in the leader’s case) kills the dragon. Better odds than before, for certain, but to get those odds, we are going to have to learn how to deploy these natives to the battle.
Luring vs. Deploying
In our last combat tutorial post, we used a hireling to lure a troll, allowing the Black Knight to score some fairly easy kills. Deploying is very similar to luring in that it allows us to use our hirelings to attack (and be attacked by) monsters. However, the two actions are different in some pretty important ways.
Luring
- In a given combat round, a hireling can lure a single monster
- Conversely, a monster can only be lured by a single hireling, so you cannot make two hirelings attack the same enemy by luring
- A lured monster is placed on the hireling’s combat sheet
- The lured monster will attack the hireling whose sheet it is on
- A hireling on his own combat sheet does not reposition, or change tactics — you choose what box he is in and which side he fights on, and those don’t change
- A hireling who lures a monster instantly becomes unhidden — there is no way for a hidden hireling to attack an enemy without reprisal
- In a given combat round, a hireling can be deployed to a single monster
- However, any number of hirelings can be deployed to the same monster — any number of hirelings can attack the same monster by deploying
- Deployed natives are placed on the monster’s combat sheet
- The monster will attack one of the hirelings deployed to his sheet — this will be the last hireling deployed to its sheet
- A hireling on an enemy’s sheet repositions and rolls to change tactics — you cannot guarantee which maneuver is used, or which side his chit will be played on
- A hireling who is deployed to a monster instantly becomes unhidden — there is no way for a hidden hireling to attack an enemy without reprisal
 |
| The Start of the Battle |
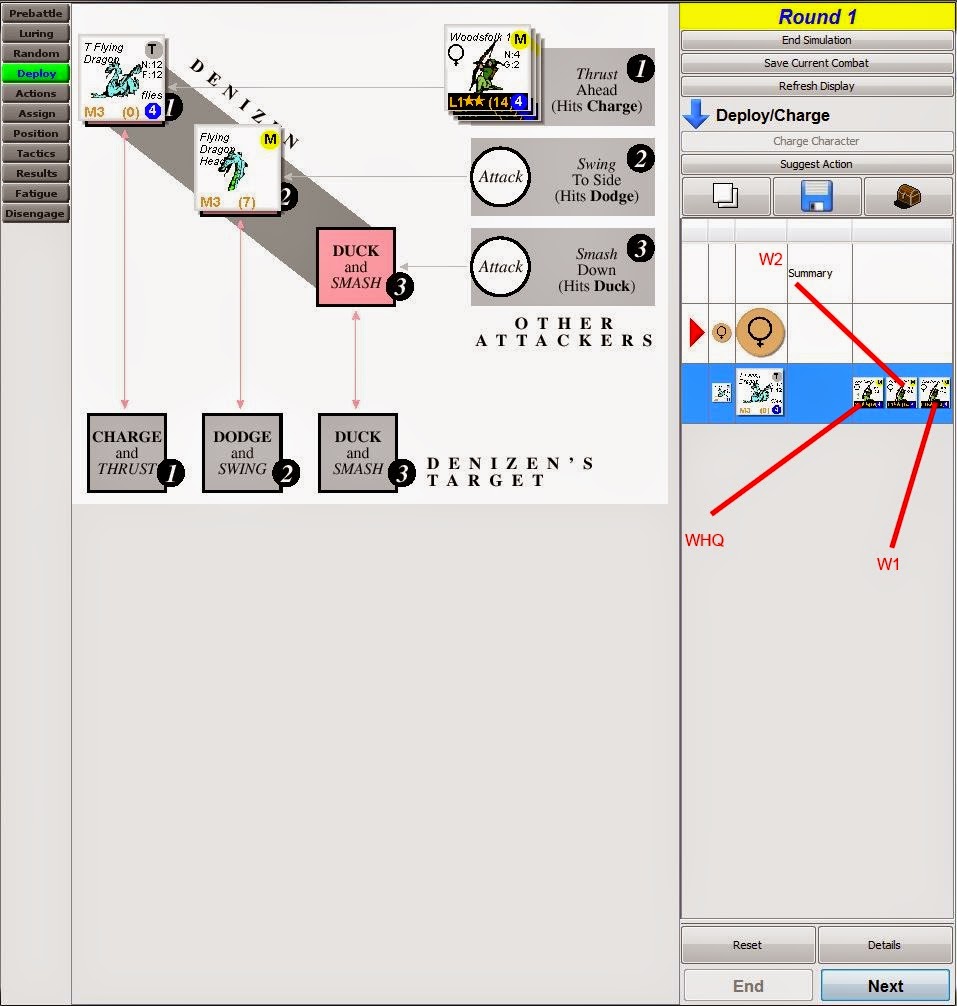 |
| Dragon’s Sheet After Deployment |
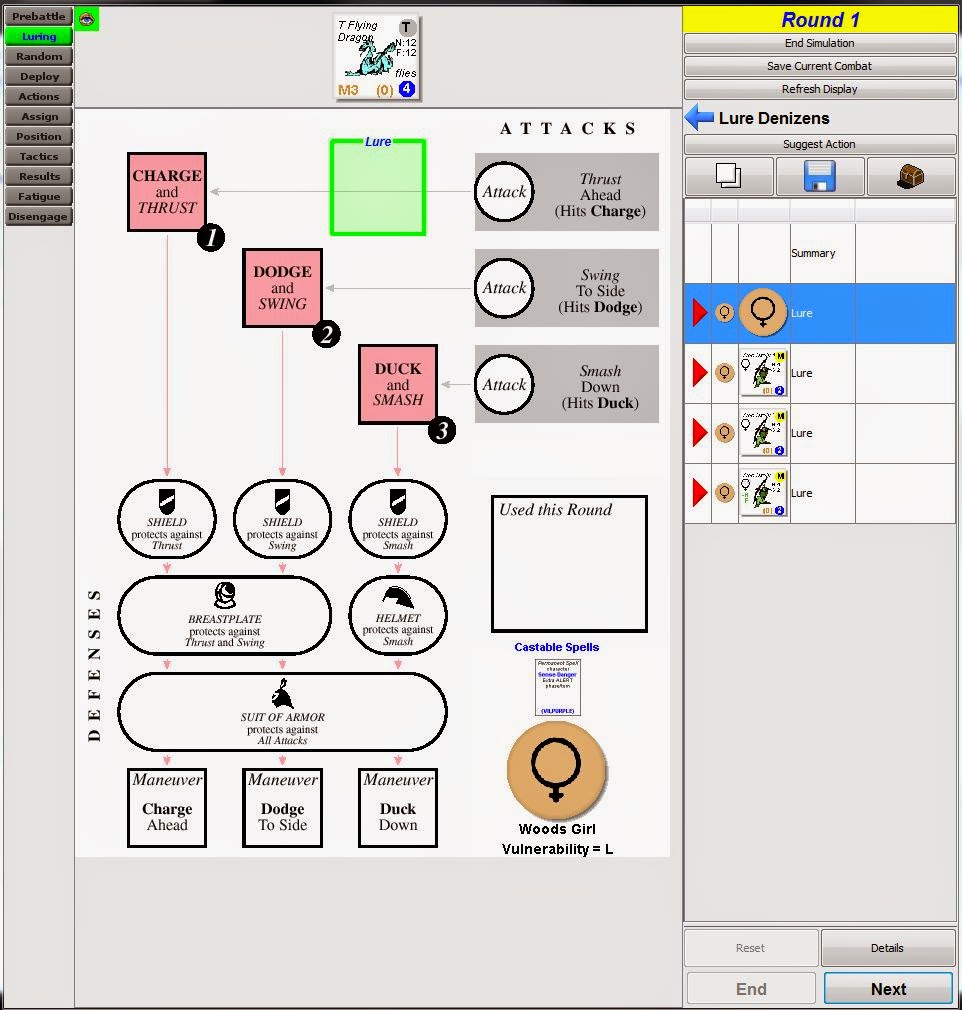
Notice we placed each archer dark-side up. This is because archer natives don’t attack at all light-side up, and we need as many attacks as possible for this tactic to work. Now, we can’t actually control if they stay dark-side up or not, but we know that the roll to change tactics is a 6 — which comes up about 30% of the time in Magic Realm. Placing our archers dark-side up to begin the round gives them a 70% chance to stay that way through the end of the round.
Next thing we will do is alert the Woods Girl’s bow with a FIGHT L4. Since she has no enemies on her sheet, any FIGHT chit will do. We then assign the Woods Girl’s target and move onto the Position phase.
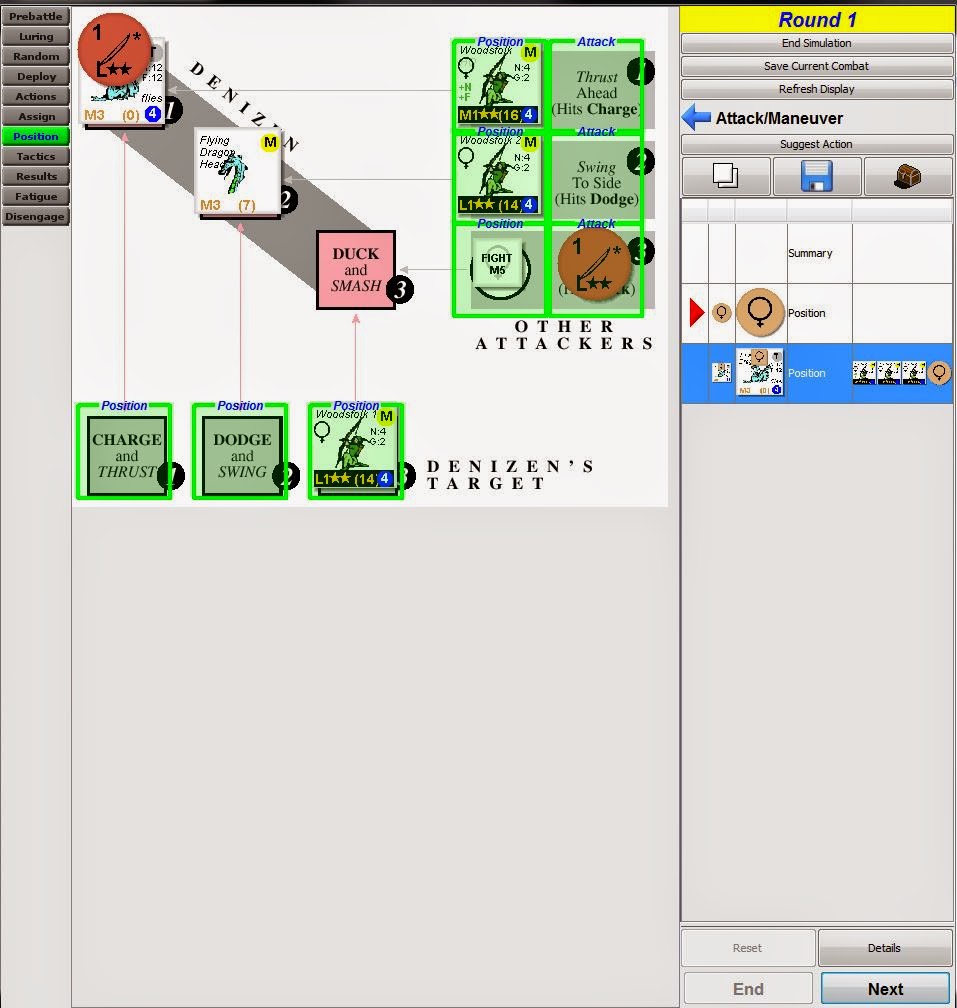 |
| Round 1 — Position Phase |
It does not really matter where we position our forces this combat. Each archer will either undercut the Dragon, or not attack at all. Our attacks are all longer and faster than the Dragon’s and so we will get the first shots. We have set this combat up so that all of our attacks get a chance to kill the Dragon. However, if noneof our attacks kill the Dragon, it has a 2/3 chance of smoking poor, brave W1. All in all, we end up with a 43% chance of killing the dragon this round, a 38% chance of losing a hireling, and a 19% chance of no one dying.
Not awesome odds… but better than before.
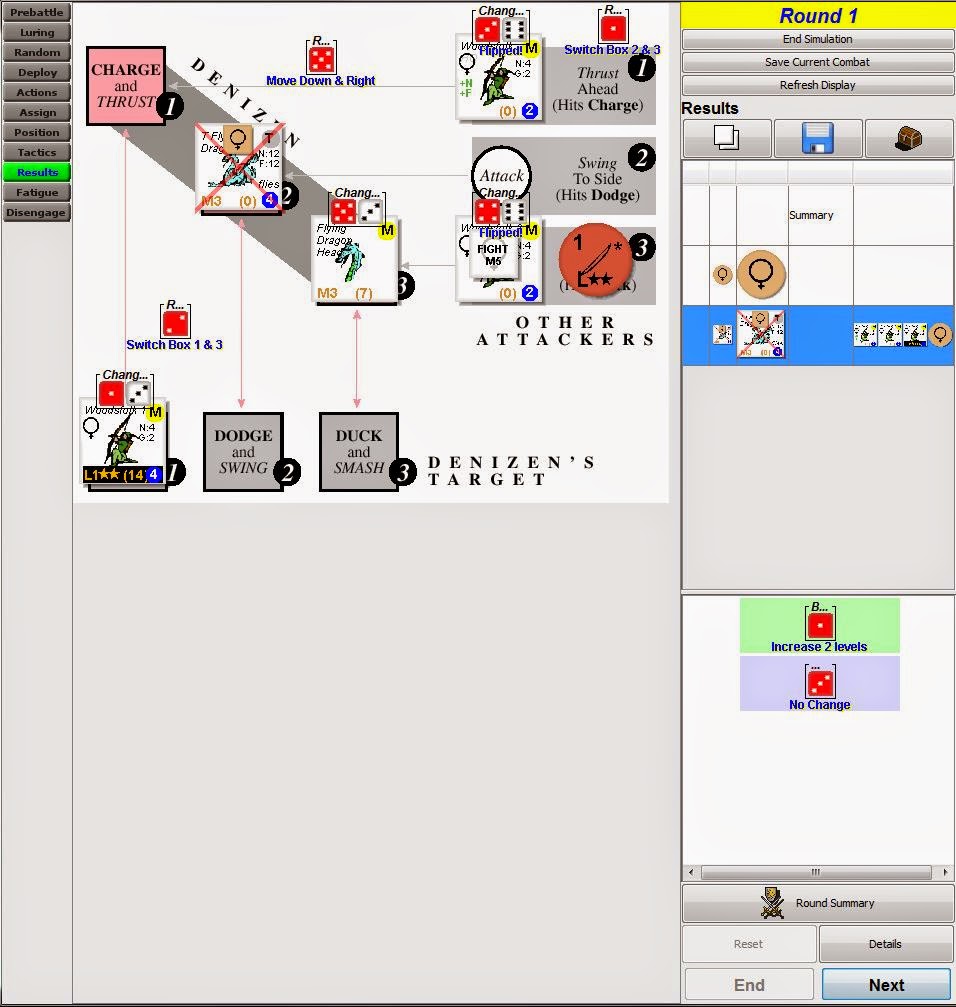 |
| Round 1 — Result |
So what happened? Well, first let’s look at the repositioning rolls. Notice that the hirelings on the right-hand side share a single reposition roll, while the target hireling on the bottom gets his own roll. Mainly, this tells you to spread out your hirelings in the attack circles to maximize your chance to hit.
In this case, it didn’t matter because as you can see, both natives on the right rolled a 6 on their change tactics roll, so they flipped and didn’t attack at all. W1 rolled a 3 to change tactics, so he stayed dark-side up, undercutting the dragon. His missile roll was a 1, which increased his harm to H*, killing the beast!
We lucked out and won this fight without losing a single archer. Of course, there was no guarantee things would go so smoothly. The odds were barely in our favor Round 1, and if W1 died, the chances would shift in favor of the Dragon and pretty quickly spiral out of control.
I think I will end this one here. There is a little more to cover about deploying, but this has been stuck as a draft for a couple of weeks, so I want to get it out there. Keep checking back for more Magic Realm combat posts. In the near future, we will cover magic… and the even more mysterious horses!
[/vc_column_text][/vc_column][/vc_row]